The display has 128x64 pixel, works with 3.3V on the data pins and 5V for the internal LCD controller chip NT7534 or NT7538 ([Datasheet for NT7534)](https://www.crystalfontz.com/controllers/Novatek/NT7534/189/) and the background LEDs. There are 8 data pins (works in parallel mode (P/S on 3.3V)). The pin chip pin C86 is on 3.3V so we have a 6800 processor bus with A0 (D/I) Enable and R/W.
A0 must rise from Low to High to make the display fetch data (rising edge!!)
We are using a [Teensy 2.0](https://www.pjrc.com/teensy "Teensy 2.0") from pjrc with Teensyduino. The Teensy was converted to 3.3V ([Teensy to 3.3V](https://www.pjrc.com/teensy/3volt.html "link to convert Teensy to 3.3V") and one Pin was misused to get the 5V from USB to the display.
All other Arduino with 3.3V may be used. If an 5V Arduino board is used you need converter chips. If you want to use less pins you can use a mux latch (ex. 74HC259).
For the backlight we use an 2N7000 (FET) to switch it with Teensy (APin 7) because the backlight needs some 50mA and the Teensy delivers only 40mA max..
### Connections to Teensy
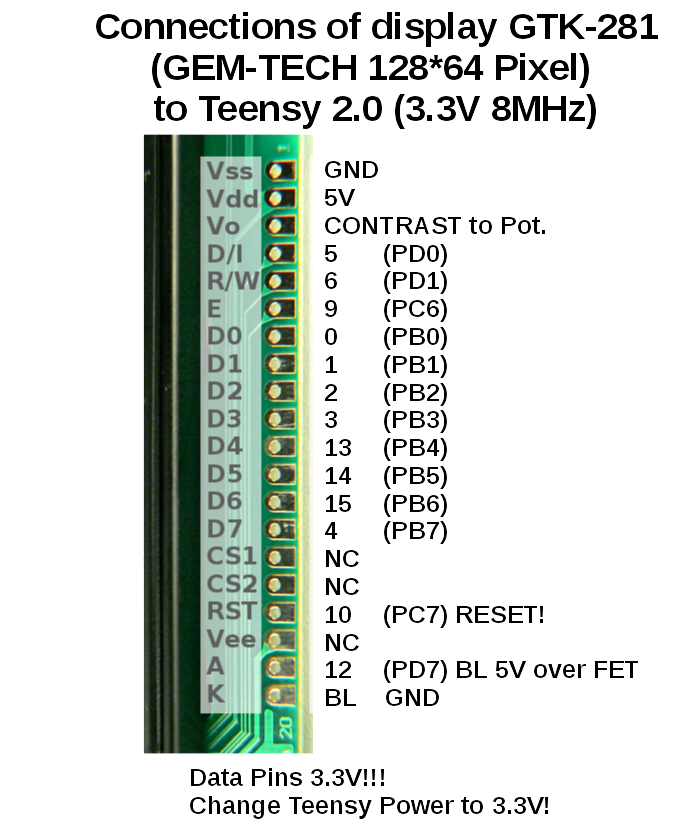
NT7534glcd(5,6,9,10,// di rw en rst0,1,2,3,13,14,15,4);// d0 to d7
### Connections to ESP32
NT7534glcd(26,27,32,33,// di rw en rst16,17,18,19,21,22,23,25);// d0 to d7
### Connections to RPI Pico 2040
NT7534glcd(14,13,12,2,// di rw en rst11,10,9,8,7,6,5,4);// d0 to d7
Arduino library
To install the library download `NT7534.zip`, and click in Arduino IDE `Sketch -> Include Library -> Add .ZIP Library...`.
The library has two examples: `nt7534\_disptest` (see video above) and `nt7534\_SHT75` (see photo above).
For the second example a temperature sensor has to be connected to the Teensy (DATA to APin 16 and SCK to APin 17; don't forget the 10k PU from DATA to VDD). We also need an Arduino library for the SHT75 sensor. I used the lib from spease: .
Bob Fisch () helped to make the library also compatible with other microcontroller like the ESP32.
