Single board computer projects
ROS2: The robotic operation system basics
last updated: 2024-08-28
Quick links
- Intro
- ROS2
- Setting up ROS2 (jazzy/humble) on the main computer (Ubuntu 24.04/22.04, 64 bit)
- Setting up ROS2 (jazzy/humble) on the Raspberry Pi (Ubuntu 24.04/22.04, 64 bit)
- Creating a package with two python nodes (pub/sub) in our own workspace
- Using a launch script
- ROS2 conventions, tools and commands
- Interesting links
Intro
I wanted to understand, how to work with the ROS. First steps were the Nasa JPL Open Source Rover Project. My students built this robot in 2018, but had problems with the software. Subsequent attempts by students also failed due to the software. Constant changes to the robot and the software did not make the task any easier.
In 2021 I programmed a TurtleBot3 but did not document the steps. Now I will try to update the software and document it :). I will use the newer ROS2 instead of ROS (ROS1).
There exists many documentations and books for ROS1, but in 2024 only one book from Francisco Martin Rico for ROS2. So perhaps this documentation will help.
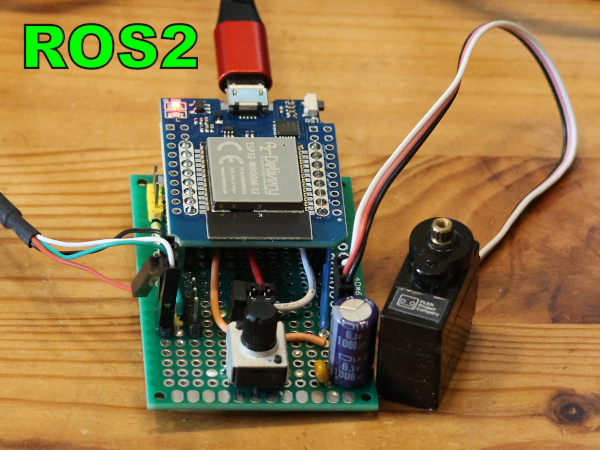
This is a short introduction to ROS2. On another page I will use a simple ESP32 circuit (Arduino) with potentiometer (sensor) and servo (actuator) and create two ROS2 nodes to access these. There will also be a page about the Turtlebot3 and the JPL NASA Open Source Robot:
- ESP32 with potentiometer (sensor) and servo (actuator)
- ESP32 with potentiometer (sensor) and Dynamixel AX-12A (actuator)
- TurtleBot3
ROS2
Real robot software that can do more than move a robot like our Creative-lab rover is complex and needs more than a microcontroller. The quasi standard software for robots is ROS (Robot Operating System). The name is confusing, because ROS is a middleware between the operating system and the user (robot) applications, with more than drivers and libraries. The middleware also offers tools to develop, execute, simulate and monitor.
ROS is open source and well documented, but sometimes confusing because of the many possibilities and the different versions and distros. Find many links to the documentation in the "Interesting links" section.
ROS (ROS1) was started in 2007. The successor with many improvements ROS2 in 2015 (first release 2017 ardent).ROS2 is not backward compatible with ROS 1 (e.g. ROS2 has no master or roscore)!
The philosophy of ROS2
- One separate small program for each task (cf Unix)
- Peer to peer communication (mesh). The programs (nodes) exchange messages through an anonymous publish/subscribe mechanism from one program to another.
- ROS programs can be written in many different languages (C++, Python, Javascript...).
- ROS is open source and has a large community of developers.
ROS2 concepts
I will not dive in, but describe only in short concepts and the items that are relevant to understand, and get things running. As stated is everything already well documented (e.g. http://wiki.ros.org/ROS/Concepts)
ROS has three levels of concepts:
- the ROS Community level (e.g. Distributions and documentation)
- the ROS Computation Graph level (Computational Graph)
- the ROS Filesystem level (Workspace)
ROS2 distros
ROS is released as distributions (distros) from the ROS community of developers. This is a collection of tools and applications and libraries that work well together. The distros use names in alphabetic order. As in Linux distros stable LTS (Long Term Support) versions are recommended. New ROS distros are released every year on world turtle day (LTS distros only in even years). ROS runs best on a specific version of Ubuntu Linux. For more information: https://www.ros.org/reps/rep-2000.html.
The currently recommend distributions are:
- (ROS(1) LTS Noetic Ninjemys (May 2020 - May 2025, , Ubuntu 20.04))
- ROS2 LTS Humble Hawksbill (May 2022 - May 2027, Ubuntu 22.04)
- ROS2 Iron Irwini (May 2023 - November 2024, Ubuntu 22.04)
- ROS2 LTS Jazzy Jalisco (May 2024 - May 2029, Ubuntu 24.04)
I tried the latest ROS2 LTS Jazzy Jalisco with Ubuntu 24.04. This worked well, but for the time being, there are no packages for my TurtleBot3. So I also used to ROS2 LTS Humble Hawksbill with Ubuntu 22.04. In the commands to install ROS, only the word jazzy has to be replaced by humble to use a different distribution.
Computational Graph
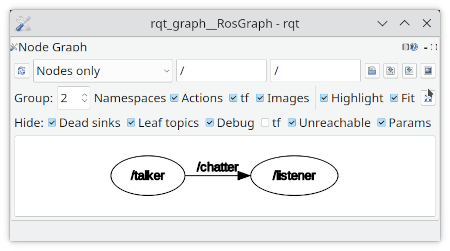
A running ROS2 application is a Computational Graph made of nodes (collection of points) and arcs (lines running between the nodes.). It shows the software (ROS2 application) during execution and is dynamic (can change over time). The graph is at the heart of any ROS 2 system.
Nodes and communication
A node in ROS is responsible for a single, task like controlling the wheel motors or publishing sensor data from a distance sensor. But also monitoring tools can be a node. Each node can send and receive data from other nodes via topics, services, actions, or parameters. In ROS2, a single program can contain one or more nodes.
ROS2 uses intensive Object-Oriented-Programming and so a node is an object of class Node. The most used languages are C++ and Python. To facilitate things, a ROS node is written with the use of a ROS client library, such as roscpp (for C++) or rospy (for python).
Nodes communicate among each other using 3 different ways:
- Publication/Subscription: Most used in ROS. An asynchronous communication using topics to publish and subscribe to (cf MQTT).
- Services: A node requests information from another node (synchronous, client/server). The server needs to give an immediate response.
- Actions: Asynchronous request to another node (client/server)). Can take time. Client is updated periodically. Must be non blocking!
Nodes are active elements, do processing or control, and can execute their task in two ways:
- Iteratively: The software runs in a loop and acts with a specific frequency (e.g. 10 times per second (10 Hz)).
- Event oriented: An incoming message triggers the execution.
Workspace
We need a place for our ROS2 code to live in. A workspace is a set of directories created for our project with an src folder containing the packages. The workspace has to be activated! Only than the software in the workspace can be used. There can be more than one workspace, and they can be active at the same time.
Usually we have the underlay workspace with the basic ROS2 installation, and an overlay workspace with our own robot packages. Both workspaces need to be activated.
Packages
A package includes executable programs, libraries and message definitions that serve a common purpose. Packages often depend on other packages. Packages can be installed with the OS installation system (after configuring the APT ROS2 repsitory). In Debian/Ubuntu we use the command apt install. The package names start with ros-ros-jazzy-turtlebot3-msgs).
But packages can also be installed from source. Before running ROS2 the dependancy of the packages must be controlled and satisfied.
Setting up ROS2 (jazzy/humble) on the main computer (Ubuntu 24.04/22.04, 64 bit)
Next we will set up ROS2 on a computer (main) and a robot. The main computer can be a laptop or desktop and is meant to monitor the robot. I use two Raspberry Pi, one as main computer and one for the robot. Naturally we can also use the robot without main computer, or a main computer for simulation with no robot. If we use a main computer and a robot (or more computer) we need a functioning WiFi network.
I installed ROS2 jazzy without problems on my Desktop Computer running Kubuntu 24.04.
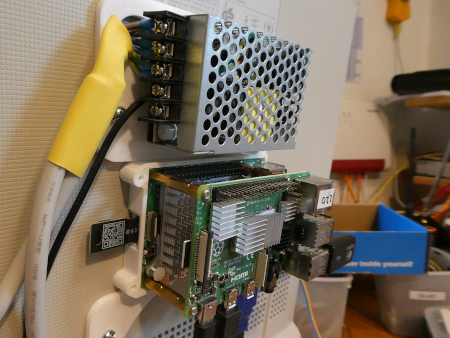
As I want to be able to easily move my ROS main computer (and have no laptop left), I will use a Raspberry Pi 5 mounted on an old computer monitor as main computer. Then I realized, that I need 2 different Ubuntu OS (22.04 for my turtlebot3 (humble) and 24.04 to test jazzy). But Ubuntu 22.04 is not available for Raspi 5!
I could use a Raspi 4 and boot multiple Ubuntu images with PINN but got an error saying that the partition label of system-boot is not available. I think it is not possible to install two Ubuntu distros at the same time.
So I installed Ubuntu 22.04 with ROS2 Humble on a Raspberry Pi 4 and screwed the second Pi on top of the Raspi 5.
To install Ubuntu use an endurance SD card with enough space (e.g. 64GB). With the Raspi Imager we chose Raspi 4 respectively 5 as device and under Operating System Other general-purpose OS -> Ubuntu-> Ubuntu Desktop 24.04 (resp. 22.04) LTS (64 bit) and burn the card. Then we insert the card into the Raspi and boot the Desktop version.
After this we set up WiFi, the keyboard and the location in the GUI. Its also a good idea to assign fixed ip address (Settings WiFi). After this we update and upgrade the software. It was also necessary to install the openssh-server to be able to ssh into the computer.
    sudo apt update && sudo apt upgrade
    sudo apt install ssh -y
Locale must support UTF-8. Test with locale. Ensure that the Ubuntu Universe repository is enabled:
    locale
    sudo apt install software-properties-common
    sudo add-apt-repository universe
Then we add the ROS2 GPG key and the repo to sources list in /etc/apt/sources.list.d:
    sudo apt update && sudo apt install curl -y

    sudo curl -sSL https://raw.githubusercontent.com/ros/rosdistro/master/ros.key \
    -o /usr/share/keyrings/ros-archive-keyring.gpg

    echo "deb [arch=$(dpkg --print-architecture) \
    signed-by=/usr/share/keyrings/ros-archive-keyring.gpg] \
    http://packages.ros.org/ros2/ubuntu $(. /etc/os-release && echo $UBUNTU_CODENAME) main" \
    | sudo tee /etc/apt/sources.list.d/ros2.list > /dev/null
Then we install ROS2:
    sudo apt update && sudo apt upgrade
    sudo apt install ros-jazzy-desktop
    #sudo apt install ros-humble-desktop
    sudo apt install ros-dev-tools
The command-line utility rosdep is a meta-package manager and a dependency management utility. It identifies dependencies that are not satisfied and installs them. Install it and run the following commands after installation (this must be done only once).
    sudo apt install python3-rosdep
    sudo rosdep init
    rosdep update # without sudo!
Now we use the source command to activate the environment. The source command is a built-in feature of the shell and can execute shell scripts within the current shell environment. The script then manipulates variables, functions, and other shell features directly. This must be done every time before running a ros2 command. ros2 is the main command in ROS2! It interacts with the ROS2 system to carry out actions or to gather information. Look at the output to understand the syntax.
    source /opt/ros/jazzy/setup.bash
    # source /opt/ros/humble/setup.bash
    ros2
It's a good idea to add the ROS environment setup script content to to all the terminal sessions, so we do not need to use the source command every time we open a new terminal. This can be done by using bashrc in the home folder:
    echo "source /opt/ros/jazzy/setup.bash" >> ~/.bashrc
    # echo "source /opt/ros/humble/setup.bash" >> ~/.bashrc
    source ~/.bashrc
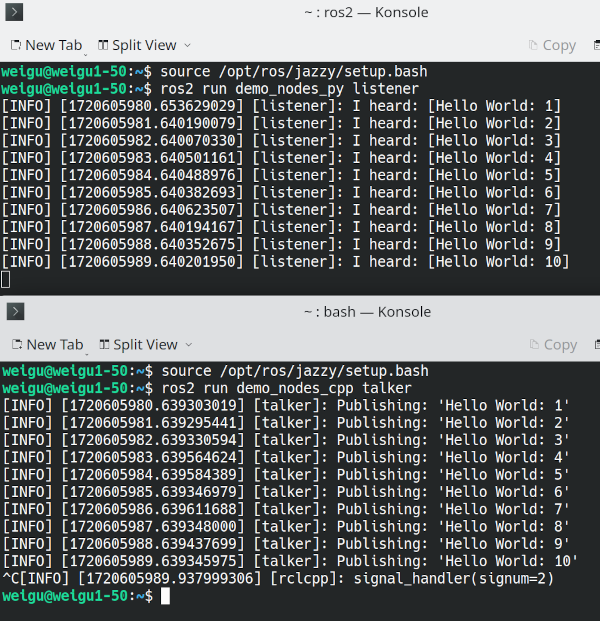
We test ROS2 by running a C++ (or python: demo_nodes_py) talker and a listener in two different terminal windows. The command ros2 run launches an executable from a package.
1 Terminal:
ros2 run demo_nodes_cpp listener
2 Terminal:
ros2 run demo_nodes_cpp talker
Result:
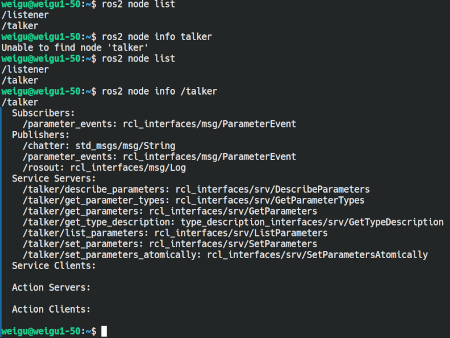
Now we can list the used nodes, get info from the nodes (e.g. find the topic) and with the command rqt_graph (ros qt) we can even visualize the graph.
    ros2 node list
    ros2 node info /talker
    rqt_graph

Here two links for the installation of ROS: + https://docs.ros.org/en/jazzy/Installation/Ubuntu-Install-Debians.html + https://docs.ros.org/en/humble/Installation/Ubuntu-Install-Debians.html
Setting up ROS2 (jazzy/humble) on the Raspberry Pi (Ubuntu 24.04/22.04, 64 bit)
For best support with ROS2 Jazzy we use a 64 bit Ubuntu 24.04 LTS (for ROS2 Humble a 64 bit Ubuntu 22.04 LTS) and we run ROS2 directly in Ubuntu like above (alternatively we could use Raspi OS wit a docker container).
For this tests I will use a Raspi 3B+ (needs less energy than Raspi 4).
With Ubuntu 24.04 Server (Other general-purpose OS -> Ubuntu -> Ubuntu Server 24.04 LTS (64 bit)) I had no problems, but by trying Ubuntu 22.04 server I had issues with the network and with the keyboard. Ubuntu 22.04 Desktop was not available for Raspi 3B+, so I chose Raspi 4 in Pi Imager and was able to install the Desktop Version. And this version is also running on the Raspi 3B+!
Jazzy on Ubuntu 24.04 Server
After burning the card, power the Raspi up with the SD card inserted and look for the IP address with nmap or in the router gui. Than we ssh into the pi and update everything.
    sudo ssh pi@192.168.xxx.xxx
    sudo apt update && sudo apt upgrade
    sudo apt install mc # midnight commander makes life easier
I love static IP addresses, and so I changed the automatically created netplan yaml-file (/etc/netplan/50-cloud-init.yaml) to get a static IP address (use nano or mc):
network:
    version: 2
    wifis:
        renderer: networkd
        wlan0:
            access-points:
                myssid:
                    password: xxxxxxxxxxxxxxxxxxxxxx
            dhcp4: no # static
            addresses:
                - 192.168.1.xxx/24  # static address mask 255.255.255.0
            routes:
                - to: default
                  via: 192.168.1.xxx # gateway address
            nameservers:
                addresses: [192.168.1.xxx, 8.8.8.8, 8.8.4.4] # gateway and google
myssid is the real name of the SSID.
After this reboot or use:
sudo netplan apply
Ssh with the new IP.
More info: https://linuxconfig.org/setting-a-static-ip-address-in-ubuntu-24-04-via-the-command-line.
Humble on Ubuntu 22.04 Desktop
After installing the Desktop Version we need to connect the Raspi to a monitor, keyboard and mouse. Then we set up WiFi, the keyboard and the location in the GUI. I also added a fix IP address (Settings WiFi). After this I updated and upgraded the software in a terminal window. It was also necessary to install the openssh-server to be able to ssh into the computer.
    sudo apt update && sudo apt upgrade
    sudo apt install ssh mc -y # midnight commander makes life easier
Reboot or use
    sudo systemctl enable --now ssh
    sudo systemctl status ssh
Now we can remove everything and access the Raspi via ssh.
I did add the static IP address in the GUI because I had problems with netplan. Ubuntu 22.04 uses the NetworkManager. Zhe static IP address is saved in /etc/NetworkManager/system-connections/myssid.nmconnection. The following lines define the static address:
    [ipv4]
    address1=192.168.1.xxx/24,192.168.1.1
    dns=192.168.1.1;
    method=manual

    [ipv6]
    addr-gen-mode=stable-privacy
    method=disabled
Installing and testing ROS2
Next we repeat the steps from the previous chapter.
    sudo apt update && sudo apt install curl -y

    sudo curl -sSL https://raw.githubusercontent.com/ros/rosdistro/master/ros.key \
    -o /usr/share/keyrings/ros-archive-keyring.gpg

    echo "deb [arch=$(dpkg --print-architecture) \
    signed-by=/usr/share/keyrings/ros-archive-keyring.gpg] \
    http://packages.ros.org/ros2/ubuntu $(. /etc/os-release && echo $UBUNTU_CODENAME) main" \
    | sudo tee /etc/apt/sources.list.d/ros2.list > /dev/null
Then we install ROS2:
    sudo apt update && sudo apt upgrade
    sudo apt install ros-jazzy-desktop
    # sudo apt install ros-humble-desktop
    sudo apt install ros-dev-tools
    sudo apt install python3-rosdep
    sudo rosdep init
    rosdep update # without sudo!
    echo "source /opt/ros/jazzy/setup.bash" >> ~/.bashrc
    # echo "source /opt/ros/humble/setup.bash" >> ~/.bashrc
    source ~/.bashrc
Now we test ROS2 by running a talker and a listener program on two different computers!
Main computer:
ros2 run demo_nodes_cpp talker
Robot:
ros2 run demo_nodes_cpp listener
The result should be the same as above.
Creating a package with two python nodes (pub/sub) in our own workspace
For simplicity I will use python and a standard example. For C look at the following link:
https://docs.ros.org/en/jazzy/Tutorials/Beginner-Client-Libraries/Creating-Your-First-ROS2-Package.html https://docs.ros.org/en/jazzy/Tutorials/Beginner-Client-Libraries/Writing-A-Simple-Py-Publisher-And-Subscriber.html
The underlay is up and running. Now we will create our own overlay workspace directory in our home directory containing an src directory. Then we create our use the tool:
    cd ~
    mkdir -p myros2_ws/src
    cd myros2_ws/src
    ros2 pkg create --build-type ament_python --license Apache-2.0 py_pubsub --dependencies rclpy std_msgs
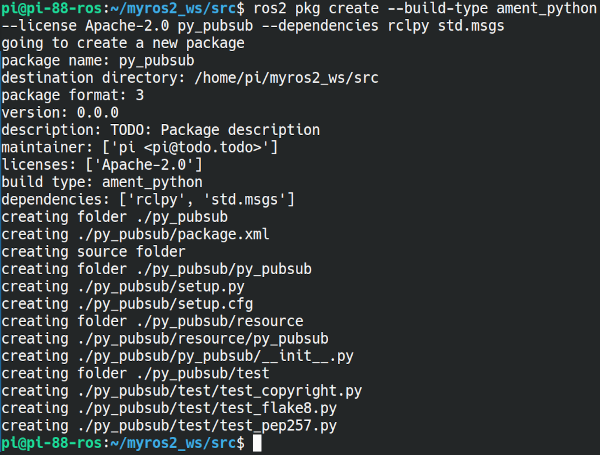
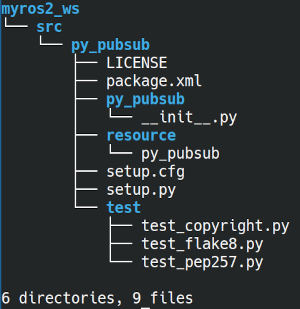
We added two dependencies in the command. The package will depend on the package with the python client libraries rlcpy and on the standard messages package std:msgs.
We see that the ros2 pkg create command creates 6 directories and 9 files. Let's take a look at the package.xml file:
    <?xml version="1.0"?>
    <?xml-model href="http://download.ros.org/schema/package_format3.xsd" schematypens=">
    <package format="3">
      <name>py_pubsub</name>
      <version>0.0.1</version>
      <description>pub example node</description>
      <maintainer email="weigu@weigiu.lu">weigu</maintainer>
      <license>Apache-2.0</license>
      <url type="website">https://www.weigu.lu/sb-computer/ros2</url>
      <author email="weigu@weigu.lu">Guy WEILER</author>

      <depend>rclpy</depend>
      <depend>std.msgs</depend>

      <test_depend>ament_copyright</test_depend>
      <test_depend>ament_flake8</test_depend>
      <test_depend>ament_pep257</test_depend>
      <test_depend>python3-pytest</test_depend>

      <export>
        <build_type>ament_python</build_type>
      </export>
    </package>
In the package.xml file we can change the
Next we create the python files with our code. Often we copy matching existing packages, and change or add to the content and code of the existing files. In this case we fetch two existing example files with wget.
    cd myros2_ws/src/py_pubsub/py_pubsub
    wget https://raw.githubusercontent.com/ros2/examples/jazzy/rclpy/topics/minimal_publisher/examples_rclpy_minimal_publisher/publisher_member_function.py
    wget https://raw.githubusercontent.com/ros2/examples/jazzy/rclpy/topics/minimal_subscriber/examples_rclpy_minimal_subscriber/subscriber_member_function.py
Our python code files is are named publisher_member_function.py and subscriber_member_function.py. I added some comments. More info in the link above.
publisher_member_function.py
    #!/usr/bin/env python
    import rclpy       # the imports match the dependencies from package. xml
    from rclpy.node import Node     # import python node class
    from std_msgs.msg import String # import the built-in string message type

    class MinimalPublisher(Node): # our pub node class
        def __init__(self):
            super().__init__('minimal_publisher') # pass name to node class
            self.publisher_ = self.create_publisher(String, 'my_topic', 10)
            timer_period = 0.5    # 0.5 seconds
            self.timer = self.create_timer(timer_period, self.timer_callback)
            self.i = 0            # counter for message
        def timer_callback(self): # is called every 0.5s from timer
            msg = String()
            msg.data = 'Hello World: %d' % self.i
            self.publisher_.publish(msg) # publish to topic
            self.get_logger().info('Publishing: "%s"' % msg.data) # log to console
            self.i += 1           # increment counter

    def main(args=None):
        rclpy.init(args=args)                  # init rclpy
        minimal_publisher = MinimalPublisher() # create publisher node
        rclpy.spin(minimal_publisher)          # loop the node so callbacks occur
        minimal_publisher.destroy_node()       # destroy the node explicitly
        rclpy.shutdown()                       # shutdown rclpy

    if __name__ == '__main__':
        main()
subscriber_member_function.py
    #!/usr/bin/env python
    import rclpy       # the imports match the dependencies from package. xml
    from rclpy.node import Node     # import python node class
    from std_msgs.msg import String # import the built-in string message type

    class MinimalSubscriber(Node): # our sub node class
        def __init__(self):
            super().__init__('minimal_subscriber')
            self.subscription = self.create_subscription(
                String,
                'my_topic',
                self.listener_callback, # listens to messages on my_topic
                10)
            self.subscription  # prevent unused variable warning
        def listener_callback(self, msg): # is called when message
            self.get_logger().info('I heard: "%s"' % msg.data)

    def main(args=None):
        rclpy.init(args=args)                    # init rclpy
        minimal_subscriber = MinimalSubscriber() # create subscriber node
        rclpy.spin(minimal_subscriber)           # loop the node so callbacks occur
        minimal_subscriber.destroy_node()        # destroy the node explicitly
        rclpy.shutdown()                         # shutdown rclpy

    if __name__ == '__main__':
        main()
Next we open the setup.py file and match the maintainer, maintaineremail and description fields to our package.xml data. And we add a two lines in the entrypoints field to start our main functions. Save the file!
    from setuptools import find_packages, setup
    package_name = 'py_pubsub'
    setup(
        ...
        maintainer='weigu',
        maintainer_email='weigu@weigu.lu',
        description='pub sub example nodes'
        ...
        entry_points={
            'console_scripts': [
                'talker = py_pubsub.publisher_member_function:main',
                'listener = py_pubsub.subscriber_member_function:main',
            ],
        },
    )
Check in the setup script that your path is $base/lib/py_pubsub. Setuptools will then put your executables in lib, because ros2 run will look for them there.
Now we run rosdep in the root of our workspace to check for missing dependencies before building. Then we built the package and run the talker:
    cd myros2_ws
    rosdep install -i --from-path src --rosdistro jazzy -y
    colcon build --packages-select py_pubsub
    source install/setup.bash
    ros2 run py_pubsub talker
Open a second terminal, navigate to ros2_ws, source the setup files and run the listener:
    cd myros2_ws
    source install/setup.bash
    ros2 run py_pubsub listener
Using a launch script
https://docs.ros.org/en/jazzy/Tutorials/Intermediate/Launch/Creating-Launch-Files.html
Robot ROS2 nodes should often be started simultaneously. This can be done with launcher script (Python, XML or YAML). Instead of the command ros2 run we will use ros2 launch. These scripts are located in the launch directory of the package and their names end mostly with _launch. With Python in the script a generate_launch_description() function returns a LaunchDescription object with different actions to run a program, include other launcher, declare launch parameters or set environment variables.
    cd myros2_ws/src/py_pubsub
    mkdir launch
    nano pubsub_launch.py
Add the following code and save (Ctrl+o,Ctrl+x).
    from launch import LaunchDescription
    from launch_ros.actions import Node

    def generate_launch_description():
        return LaunchDescription([
            Node(
                package='py_pubsub', # Package Name
                executable='talker', # Executable file
                output='screen'
            ),
            Node(
                package='py_pubsub', # Package Name
                executable='listener', # Executable file
                output='screen'
            )
        ])
    cd launch
    source install/setup.bash
    ros2 launch pubsub_launch.py
Now both nodes should run. Mark, both outputs are on one screen.
It is better to add the launch file to the package. For this we have to add the following line to the data_files list in setup.py:
(os.path.join('share', package_name, 'launch'), glob(os.path.join('launch', '*launch.[pxy][yma]*')))
This function uses the packages glob and os, so we have to import them. This gives us the following setup.py file:
    import os
    from glob import glob
    from setuptools import find_packages, setup

    package_name = 'py_pubsub'

    setup(
        name=package_name,
        version='0.0.1',
        packages=find_packages(exclude=['test']),
        data_files=[
            ('share/ament_index/resource_index/packages',
                ['resource/' + package_name]),
            ('share/' + package_name, ['package.xml']),
            (os.path.join('share', package_name, 'launch'), glob(os.path.join('launch', '*launch.[pxy]
        ],
        install_requires=['setuptools'],
        zip_safe=True,
        maintainer='weigu',
        maintainer_email='weigu@weigu.lu',
        description='pub sub example nodes',
        license='Apache-2.0',
        tests_require=['pytest'],
        entry_points={
            'console_scripts': [
                'talker = py_pubsub.publisher_member_function:main',
                'listener = py_pubsub.subscriber_member_function:main',
            ],
        },
    )
Then we rebuild the package:
    cd myros2_ws
    colcon build --packages-select py_pubsub
    source install/setup.bash
    ros2 launch pubsub_launch.py
ROS2 conventions, tools and commands
Package list
ros2 pkg list
Topic list and echo
    ros2 topic list
    ros2 topic echo /cmd_vel
Geometric conventions
- ROS2 uses the SI system (meter, seconds, radians).
- We use the right hand, reference origin on our chest. Index finger is x (+x forward, -x backward), middle finger is y (+y is left, -y is right) and thumb is z (+z is up, -z is down).
- Angles are rotations around the axes (roll: rotation around x, pitch: rotation around y, yaw: rotation around z)
- Angles grow counterclockwise. E.G. rotation around z: 0 = forward, π/2 = left, π = back.
E.g. the /cmd_vel topic sends 2 vectors: linear (xyz) and angular (xyz). For a robot like the TurtleBot only linear x (forward, backward) and angular z (turn left/right) are used.
Using rosdep to check dependencies
https://docs.ros.org/en/jazzy/Tutorials/Intermediate/Rosdep.html
The command-line utility rosdep is a meta-package manager and a dependency management utility. It identifies dependencies that are not satisfied and installs them. Install it with:
sudo apt install python3-rosdep
Run the following commands after installation:
    sudo rosdep init
    rosdep update # without sudo!
Tab-key autocompletion
type ros2 and then the Tab-key twice.
Check environment variables (get ROS2 distro version)
printenv | grep -i ROS
https://docs.ros.org/en/jazzy/Tutorials/Beginner-CLI-Tools/Configuring-ROS2-Environment.html#id6
Using rqt_console to view logs
https://docs.ros.org/en/jazzy/Tutorials/Beginner-CLI-Tools/Using-Rqt-Console/Using-Rqt-Console.html
Interesting links
- https://www.ros.org/
- http://wiki.ros.org/ROS/Concepts
- https://www.openrobotics.org/
- https://robotics.stackexchange.com/
- https://discourse.ros.org/
- Why ROS?: https://www.ros.org/blog/why-ros/
- https://www.ros.org/reps/rep-2000.html
- https://docs.ros.org/en/jazzy/
- https://docs.ros.org/en/jazzy/Installation/Ubuntu-Install-Debians.html
- https://docs.ros.org/en/humble/Installation/Ubuntu-Install-Debians.html
- https://docs.ros.org/en/jazzy/How-To-Guides/Installing-on-Raspberry-Pi.html
- https://linuxconfig.org/setting-a-static-ip-address-in-ubuntu-24-04-via-the-command-line.
- Free book from robotis.us: https://www.robotis.us/ros-robot-programming-book-digital-copy/
- https://docs.ros.org/en/jazzy/Tutorials/Beginner-Client-Libraries/Creating-Your-First-ROS2-Package.html
- https://docs.ros.org/en/jazzy/Tutorials/Beginner-Client-Libraries/Writing-A-Simple-Py-Publisher-And-Subscriber.html
- https://docs.ros.org/en/jazzy/Tutorials/Intermediate/Launch/Creating-Launch-Files.html
- https://github.com/ubuntu-robotics/ros2_cheats_sheet/blob/master/cli/cli_cheats_sheet.pdf
- https://github.com/weigu1/ros2_esp32
