Single board computer projects
.
Single board home server with Debian, openHAB 2 and MQTT
last updated: 19/06/20
My beaglebone was for some years a faithful server for my home data (photo-voltaic, heat-pump ...).
With more and more python scripts it had his problems and I got some times out of memory errors from the kernel. As I couldn't find the real cause of the errors (gnuplot very slow with big data files and many instances of gnuplot running at the same time?), I decided get another server for generating graphics.
In the meantime I got an Udoo X86 from a kickstarter campaign, and I will try to configure it as home server using MQTT and openHAB 2.
The Udoo advanced is a fan-less bard with an Intel Curie (x86 no arm) processor and 4GB RAM and a SATA port. Its much faster than the beaglebone or Raspi.
Naturally a Raspi can also be used with the newest Raspi OS (also Debian) to act as a home server. If a Raspi is used, some steps can be skipped.
Make a bootable USB-Stick from an .iso-file
The operating system will be debian stretch (this will also work for other distributions).
Download the .iso file for net install (in my case: debian-9.3.0-amd64-netinst.iso).
To burn an .iso-file to a USB drive, you can use UNetbootin. UNetbootin allows to create bootable Live USB drives for Debian, Ubuntu, and other Linux distributions without burning a CD. It runs on Windows, Linux, and Mac OS X. You can either let UNetbootin download one of the many distributions or supply your own Linux .iso-file. The user interface is easy to use. Install in Linux with:
sudo apt install unetbootin
In Linux you can also use the dd-command on the command line. Insert the USB drive (do not mount the drive), open a terminal and type dmesg. Now you see the name of your your drive (e.g. sdb, sde, ... ).
Now type the following command to burn the .iso-file:
sudo dd status=progress if=debian-9.3.0-amd64-netinst.iso of=/dev/sde bs=4M
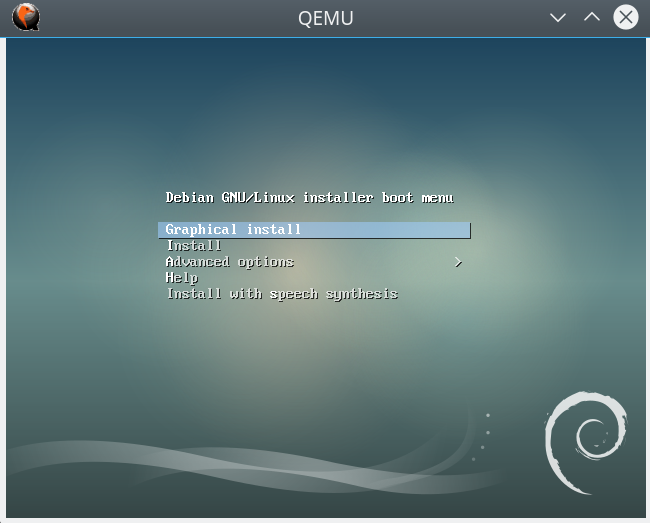
To test the burning, we can use QEMU, a machine emulator and virtualizer to boot into the usb drive.
Install qemu (apt-get install qemu) and run the following command:
sudo qemu-system-x86_64 -hda /dev/sde
Connect the external SSD
The power header of my SSD adapter has just two pins (5V and GND) in 2.54mm raster. Udoos header is 2mm raster with 4 pins (NC, 2 GND and 5V). A little hack was quickly done:
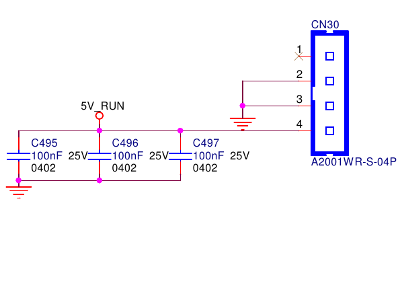
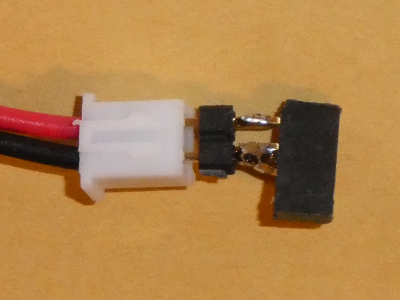
Connect a mouse, keyboard and HDMI display to Udoo to proceed. Udoo needs a 12V, 1A power supply (5-6W).
Install the operating system
Without a Stick Udoo boots in a boot shell. The Bios is configured to boot from USB, so power it up with the USB Stick inserted. If you need to change things in Bios, press ESC at boot.
After booting from the USB-Stick, choose the graphical install.
Choose the right language, localization, configure your keyboard and enter a hostname (e.g udoo-server) and a domain name. If you leave the root password empty, debian will disable root and the normal user account will be given the power to be root with sudo.
After this create your user account.
I do the partitioning manually (Partition disks: Manual), and want to use the efi mode. All files are stored on the external SSD.
| nr | size | device | mount point | file system | partition |
|---|---|---|---|---|---|
| 1 | 200 MB | /dev/sda1 | /boot/efi | esp | efi system partition |
| 2 | 16 GB | /dev/sda2 | - | swap | swap partition |
| 3 | 128 GB | /dev/sda3 | / | ext4 | root partition |
| 4 | 106 GB | /dev/sda4 | /home | ext4 | home partition |
After choosing a download server the installer asks for choose the software to install. As a server, I don't need a GUI, so I install debian headless only with an SSH server.
Update and upgrade
After reboot we log in and get the latest versions of all programs:
    sudo apt update
    sudo apt upgrade
    sudo apt dist-upgrade
It is a good idea to install the terminal file manager "midnight commander" (mc) to search and edit files as root in terminal (sudo mc), and htop an interactive process viewer.
sudo apt install mc htop
Set timezone
sudo timedatectl set-timezone Europe/Luxembourg
Control with date. (to list all timezones : sudo timedatectl list-timezones)
Add sudo
If you have a root account and want to use sudo for your default user:
    apt install sudo
    addgroup username sudo
Static IP address
The IP address of your server is given with DHCP. To get it use the following command:
ip a
To get a static IP adress is easy in Stretch. Use the editor nano or mc (F4) to append the following to the file /etc/network/interfaces.
# The primary network interface
allow-hotplug enp2s0
iface enp2s0 inet static
    address 192.168.1.100
    netmask 255.255.255.0
    gateway 192.168.1.1
Save with CTRL+O and exit with CTRL+X and reboot.
Create a backup
After all this work we want to create a backup of the installation. To do so we use a Live USB Stick (e.g. Ubuntu) and boot the server from the Stick (ESC at reboot, Boot Manager).
We connect an external USB-HDD with more space then our SSD, open it in a filemanager (mounting) and locate the mount point (e.g. /media/ubuntu/label).
After this we use dd to get an image. A pipe through gzip reduces the size.
dd bs=1M if=/dev/sda | gzip > /media/ubuntu/bu/udooServerDeb.img.gz
Log in with SSH
Now we can remove the display, keyboard and mouse an login from another computer with SSH:
sudo ssh username@192.168.1.100
or as root:
sudo ssh root@192.168.1.100
If we don't know the IP address of the server after a reboot, because it was given by DHCP we can use the nmap-command. If nmap is not installed (for Windows look at
    sudo apt install nmap
    sudo nmap -sP 192.168.1.*
Look for the IP address of your server (e.g. 192.168.1.199) and log in with SSH (putty on windows):
sudo ssh username@192.168.1.199
Install openHAB 2 on Linux
More infos in https://www.openhab.org/docs/installation/linux.html.
OpenHAB 2 is written in Java, so we need a JAVA platform (For ARM sb-computers install the 32 bit version!).
As suggested we use Zulu:
    sudo apt install dirmngr
    sudo apt install software-properties-common python-software-properties
    sudo apt-key adv --keyserver hkp://keyserver.ubuntu.com:80 --recv-keys 0x219BD9C9
    sudo apt-add-repository 'deb http://repos.azulsystems.com/debian stable main'
    sudo apt update
    sudo apt install zulu-8
Now we will install openHAB 2 stable release:
    wget -qO - 'https://bintray.com/user/downloadSubjectPublicKey?username=openhab' | sudo apt-key add -
    sudo apt-get install apt-transport-https
    echo 'deb https://dl.bintray.com/openhab/apt-repo2 stable main'\
    | sudo tee /etc/apt/sources.list.d/openhab2.list
    sudo apt update
    sudo apt install openhab2
The backslash in line 3 means that the command from line 3 continues in line 4. If you type the command in one line, remove the backslash.
Now we can start openHAB 2 by and test if its running:
    sudo systemctl start openhab2.service
    sudo systemctl status openhab2.service
To start on installation, execute the following commands to configure openHAB 2 to start automatically using systemd:
    sudo systemctl daemon-reload
    sudo systemctl enable openhab2.service
Upgrade openHAB 2:
    sudo apt update
    sudo apt upgrade
Command Line interface (CLI) to use in terminal:
    openhab-cli backup [--full] [filename]   -- Stores the current configuration of openHAB.
    openhab-cli clean-cache                  -- Cleans the openHAB temporary folders.
    openhab-cli console                      -- Opens the openHAB console.
    openhab-cli info                         -- Displays distribution information.
    openhab-cli reset-ownership              -- Gives openHAB control of its own directories.
    openhab-cli restore filename             -- Restores the openHAB configuration from a backup.
    openhab-cli showlogs                     -- Displays the log messages of openHAB.
    openhab-cli start [--debug]              -- Starts openHAB in the terminal.
    openhab-cli status                       -- Checks status (openHAB running?)
    openhab-cli stop                         -- Stops any running instance of openHAB.
Using the openHab 2 karaf console
https://www.openhab.org/docs/administration/console.html
We can connect via ssh:
ssh -p 8081 -l openhab localhost
The default username is openhab, the password habopen. The most useful command is help. It lists all the other commands. When finished you get out with logout.
Example to view all active add-ons using MQTT:
bundle:list |grep -i MQTT
To view the log in real-time:
log:tail
Paths for openHAB 2 files
In /etc/default we find the config file openhab2. In this file we find the links to the openHAB 2 default paths:
OPENHAB_HTTP_PORT=8080
OPENHAB_HTTPS_PORT=8443
OPENHAB_BACKUPS=/var/lib/openhab2/backups
OPENHAB_HOME=/usr/share/openhab2
OPENHAB_CONF=/etc/openhab2
OPENHAB_RUNTIME=/usr/share/openhab2/runtime
OPENHAB_USERDATA=/var/lib/openhab2
OPENHAB_LOGDIR=/var/log/openhab2
Install mosquitto
Install the mqtt server with:
sudo apt install mosquitto
Using openHAB with MQTT devices
For more information read the tutorial about openHAB: http://weigu.lu/tutorials/sensors2bus/07_openhab/index.html. Best is to use Visual Studio Code with openHAB plugin and a Samba share to edit the configuration files.
Here I will show how to set up openHAB for MQTT devices, using config files. The example device is an MVHR (mecanical ventilation with heat recuperation) system called piventi).
OpenHAB 2 defines the following base components:
| Bindings: | the numerous add-ons to communicate with your devices |
| Things: | your physical devices represented in openHAB 2 |
| Items: | properties and capabilities linked to Channels of your Things |
| Groups: | collections or categories containing Items |
| Sitemaps: | user-defined front-end interfaces to arrange Groups, Items, ... |
| Transformations: | helper functions to transform your data |
| Persistence: | services to store data over time |
| Rules | automation logic, the “smart” in your Smart Home! |
The first step is to install the MQTT Binding to be able to communicate with MQTT devices. Than we add the Things (this is done in the *.things configuration file). The first Thing also called Bridge will be the MQTT server. The second Thing is our device. The device has different Channels (e.g. inflow temperature, exhaust humidity etc.) corresponding to the different MQTT messages sent over one ore more topics. As we use JSON strings over MQTT, Transformations help to get the right value from the JSON string.
OpenHAB works with Items in Rules or Sitemaps, so we must link all channels to Items (this is done in the *.items configuration file). After this we are ready to create a Sitemap to look at Items values or to sent values to the Items. Rules will help to automatize the devices reactions.
To show graphs we need a database to memorize values over time. This is done with Persistence. We will use InfluxDB for this service. And finally Grafana will be used to create the graphics.
If something hangs during the configuration you can restart openHAB with:
sudo systemctl restart openhab2.service
Set up the MQTT Binding for openHAB 2
First we open openHAB in a browser with the url:
serverip:8080 (e.g 192.168.1.100:8080). Then we select Paper UI to install the MQTT binding. Search in Add-ons > Bindings for MQTT Binding and install it (mid 2018 the old MQTT openHAB 1.x binding got obsolete; uninstall that binding!).
More infos can be found at: https://www.openhab.org/addons/bindings/mqtt/
When configuring openHAB, always watch /var/log/openhab2/openhab.log for information.
(OpenHAB 2 now comes with an embedded MQTT broker if you don't want to use an external broker (Configuration > Things > + > Mqtt Binding > ADD MANUALLY > System MQTT Broker).)
Defining the Things
We need a configuration text file for our Generic MQTT device in /etc/openhab2/things/. Let's look at a some lines of a file to understand the syntax:

For the MQTT server (Bridge) we need to provide a name (here udooserver) and optionally a Label and a Location ("Udooserver" @ "weigu"). The IP address is naturally important.
The same is true for our Thing (name piventi, label and location optional).
For the Channels we distinguish between data (stateTopic) and outgoing commands (commandTopic). First we need to provide the Type (here a number for incoming data and a string for outgoing JSON string commands). Important is the Channel name. The Label (between quotes) is optional. The topic is evidently important and it is a good practice to provide min and max values for the data. As the incoming data comes as a JSON string, a Transformation helps to get the value.
E.g. The inflow The MVHR is now sending MQTT messages in JSON format:
{"air_flows":{"in":{"temp_C":22.1,"hum_%":43}}}
We can retrieve the temperature with "JSONPATH:$.air_flows.in.temp_C".
As all MQTT things use the same server, they have to be declared in the same things file, so best name it myMQTT.things :)!
Save your Things configuration file (e.g. piventi.things to the directory /etc/openhab2/things/.
Defining the Items
The syntax for Items is defined as follows:
itemtype itemname "labeltext [stateformat]" <iconname> (group1, group2, ...)
["tag1", "tag2", ...] {bindingconfig}
Fields must be entered in the order shown, itemtype and itemname are mandatory and all other fields are optional. Fields may be separated by one or more spaces, or tabs and an Item definition may span multiple lines.

The labeltext with the stateformat and the iconname are helpful for the sitemap and should be added. It is also important to add the right stateformat! If you get e.g. a float number and don't specify the %f you don't see a number in PaperUI Configuration or your Sitemap!
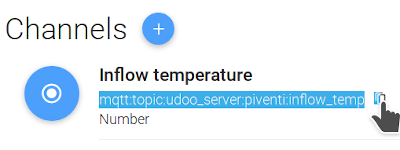
The most important field is the link to a Channel. An easy way to get the right string is to look in PaperUI after configuring the Things file (Configuration > Things + click on Thing). We find even an icon to copy the name.
Save your Items configuration file (e.g. piventi.items to the directory /etc/openhab2/things/.
Testing in PaperUI Control
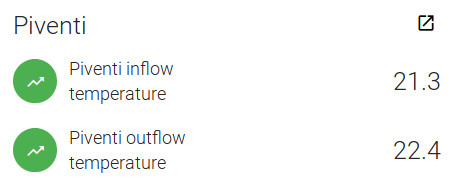
Go to PaperUI and click on Control. Under your location name you should be able to see the items and even sent messages.
Defining the Sitemap
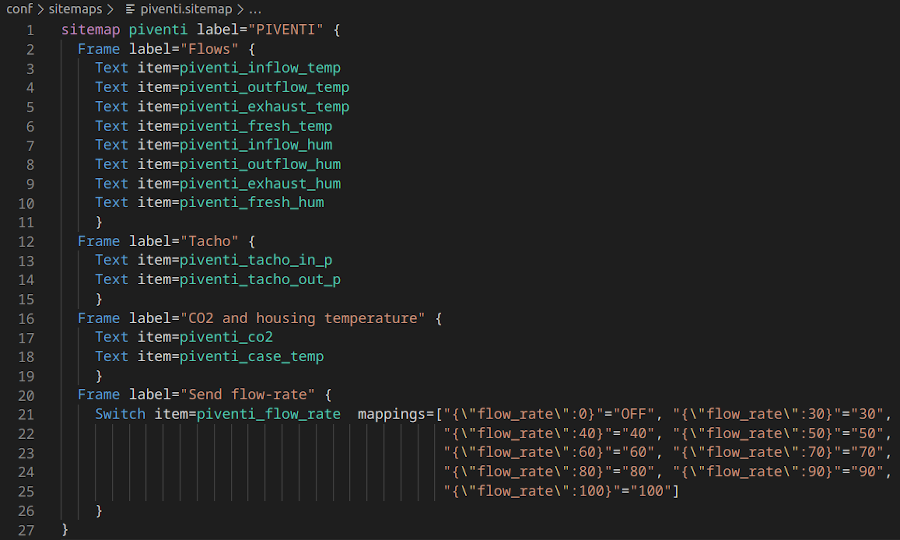
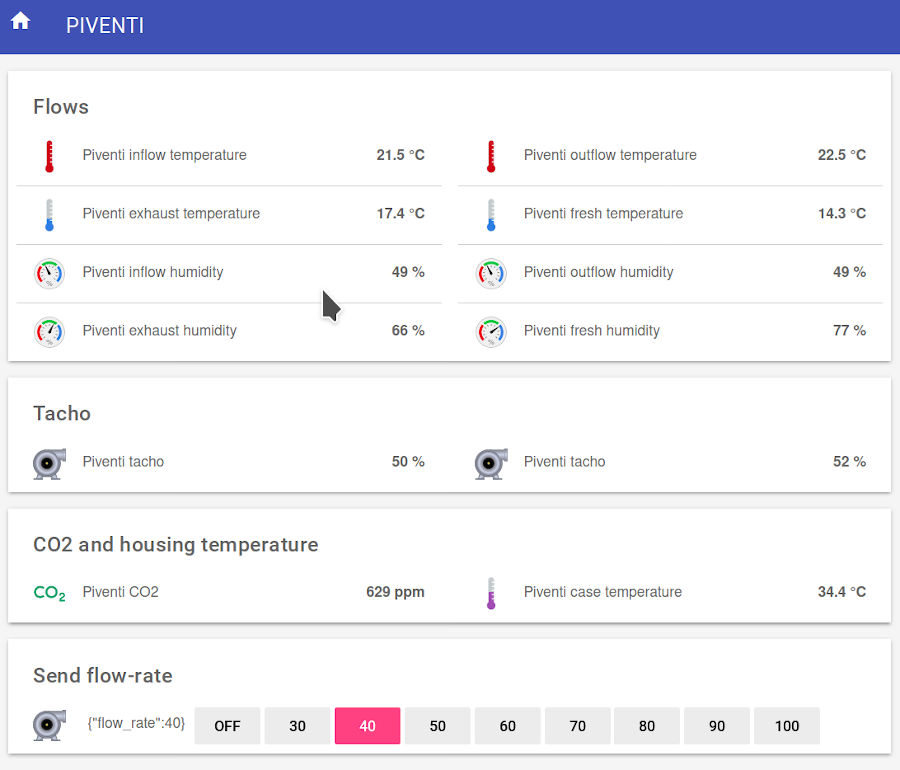
We create a text file with a content similar to the following text and name it e.g. piventi.sitemap. It is the saved in the sitemaps directory /etc/openhab2/sitemaps/. As the label and the icon are already defined in the Items configuration file, we don't need to do it here.
Defining the Rules
In an home automation system we want to automate things, so we need rules to do so. In openHAB the rules are defined in the .rules files. These files use a Domain Specific Language (DSL) near to Xtend, a general-purpose high-level programming language for the Java Virtual Machine. So if you want to dig deeper it is a goof idea to look here.
Let's look at a simple instruction line. Every rule begins with the keyword rule and has a minimum of one condition (when) and one or more instructions if the condition is fulfilled (then).
    rule "<RULE_NAME>"
    when
        <TRIGGER_CONDITION> [or <TRIGGER_CONDITION2> [or ...]]
    then
        <SCRIPT_BLOCK>
    end
Triggering a rule can mainly be:
- Item-based (openHAB event bus)
- Time-based
- System-based (system status)
- Thing-based (e.g. Thing change from ONLINE to OFFLINE)
- Channel based (depends on the Binding)
In the when block we use a trigger condition. Item based trigger conditions use the following syntax:
    Item <item> received command [<command>]
    Item <item> received update [<state>]
    Item <item> changed [from <state>] [to <state>]
The then block includes a script to perform things we need. The language used is the same that is used in the Xtend language.
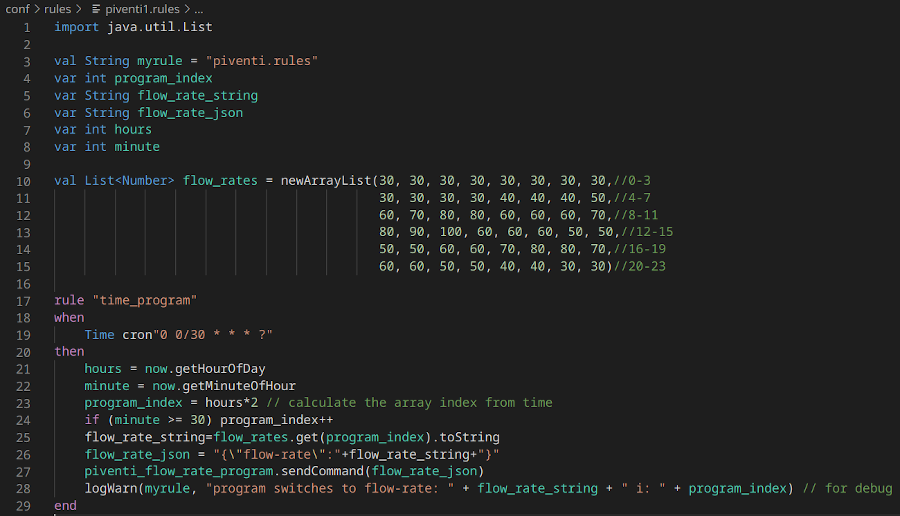
In the following example file we see a time based program for the ventilation (send flow-rate in %, JSON format). The list has half hour values for one day.
in the time-based when block we have a cron time block, triggering every half an hour (Time cron"0 0/30 * * * ?").
In the then block we calculate the index for the list from the current time and get the corresponding value and convert it to a string. After this we cook the JSON string and send the command.
It is a good practice to send debug messages to the console to see if everything works as expected. We can use different log levels (WARN, ERROR, INFO,DEBUG, ...). Here the WARN level was chosen to get another colour in the log.
Create graphs in openHAB with InfluxDB and Grafana
Persistence
To draw graphs, we need the possibility to store item states over time. This is called Persistence. As I want to use the complete data later for documentation a round-robin database like rrd4j is not a good idea. So I will use a time series database named InfluxDB.
InfluxDBekkkkjj
Installation and starting the InfluxDB server
Look on https://docs.influxdata.com/influxdb for the latest version and install instructions.
First we install the package:
    mkdir ~/downloads
    cd ~/downloads
    wget https://dl.influxdata.com/influxdb/releases/influxdb_1.8.0_amd64.deb
    sudo dpkg -i influxdb_1.8.0_amd64.deb
Then we set environment variables (control with printenv):
export INFLUXDB_CONFIG_PATH="/etc/influxdb/influxdb.conf"
The directories under /var/lib/influxdb are owned by root instead of InfluxDB, so we have to change this:
    cd /var/lib
    sudo chown -R influxdb:influxdb influxdb
To start the InfluxDB server:
sudo systemctl start influxdb
Control if everything's alright (quit with q):
sudo systemctl status influxdb
Create a Data Source
Before openHab can start persisting data in InfluxDB we have to create a database for openHAB.
Type influx to access to the InfluxDB shell:
Paste the following lines to create the InfluxDB database. Memorise your own passwords!:
    CREATE DATABASE openhab_db
    CREATE USER "admin" WITH PASSWORD 'Password1' WITH ALL PRIVILEGES
    CREATE USER "openhab" WITH PASSWORD 'Password2'
    CREATE USER "grafana" WITH PASSWORD 'Password3'
    GRANT ALL ON "openhab_db" TO "openhab"
    GRANT READ ON "openhab_db" TO "grafana"
    exit
In /etc/influxdb/influxdb.conf we change and uncomment the following lines, to gain more security and to avoid statistical data:
    reporting-disabled = true
    [meta]
      dir = "/var/lib/influxdb/meta"
    [data]
      dir = "/var/lib/influxdb/data"
      wal-dir = "/var/lib/influxdb/wal"
    [http]
      enabled = true
      bind-address = ":8086"
      auth-enabled = true
Restart the server:
sudo systemctl restart influxdb
To access the shell we need now to provide the password:
influx -username 'admin' -password '***'
Installing the openHAB Persistence for InfluxDB
To connect the running database with openHAB we need a Persistence. Click on the Paper UI icon to install the InfluxDB Persistence. Choose in Add-ons Persistence the InfluxDB (v 1.0) Persistence and install it.
Edit the file influxdb.cfg (/etc/openhab2/services/) by changing the following lines (remove the #-sign!):
    url=http://localhost:8086
    user=openhab
    password=Password2
    db=openhab_db
Add a file with the name influxdb.persit to (/etc/openhab2/persistence/) with the following content to save all changes of all Items in the database:
    Strategies {
           default = everyChange
    }
    Items {
           * : strategy = everyChange
    }
Now the service InfluxDB is running, and an openHAB database was created. The user openhab has write access to the database and openHAB will save every value at every change in the database.
If there are problems, we can have a look in the log with:
sudo journalctl -u influxdb.service
Grafana
Grafana is a powerful tool to create graphics. We will only scratch the surface :).
Installation and starting the Grafana
We will download and install the latest version for Debian with:
    sudo apt install -y adduser libfontconfig1
    wget https://dl.grafana.com/oss/release/grafana_7.0.3_amd64.deb
    sudo dpkg -i grafana_7.0.3_amd64.deb
Look at https://grafana.com/grafana/download for the latest version.
Check if the service is running:
sudo systemctl status grafana-server.service
Make the service permanent:
sudo systemctl enable grafana-server.service
Now let's change some configurations in /etc/grafana/grafana.ini. The semicolons ; have to be removed for a line to be active.
We will turn server reporting off, and don't want to sign up in our home network, so that we able as a Viewer to look at the dashboards.
Change the following lines:
    [analytics]
    reporting_enabled = false
    [users]
    allow_sign_up = false
    default_theme = light
    [auth.anonymous]
    enabled = true
Restart the service with:
sudo systemctl restart grafana-server.service
Now we can access the Grafana dashboard with with http://myip:3000 and the administration panel with http://myip:3000/login. User and password are admin. Change your password!
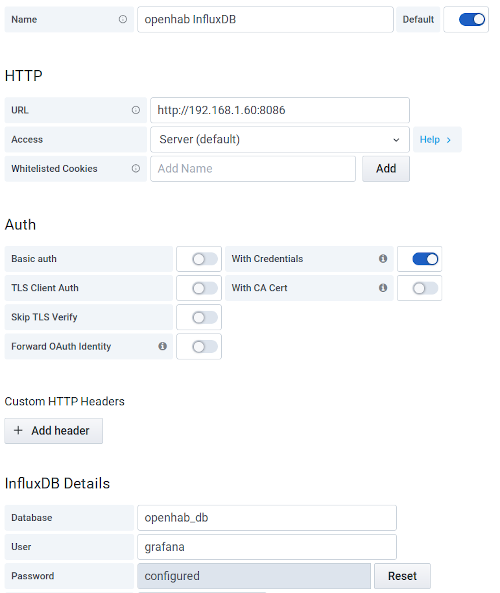
We must inform Grafana about which database we use. This is done in Configuration > Data Sources. Click on Add data source and choose InfluxDB.
We name the database openHAB InfluxDB. Add the IP in the URL and and choose With Credentials under Auth. In "InfluxDB Details" add the database and the user grafana.
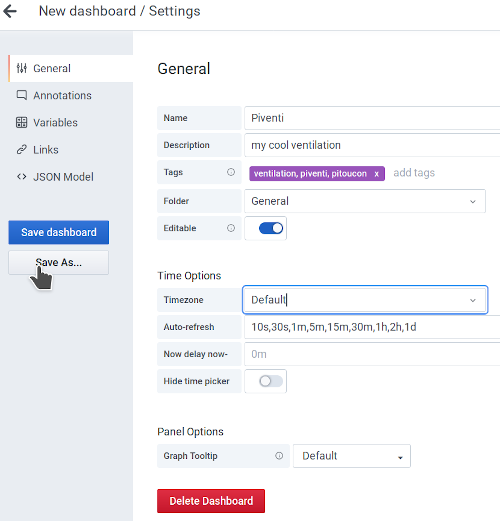
Go to + and add a first dashboard. Click on the gear icon to change the name, and add tags. Don't forget to save.
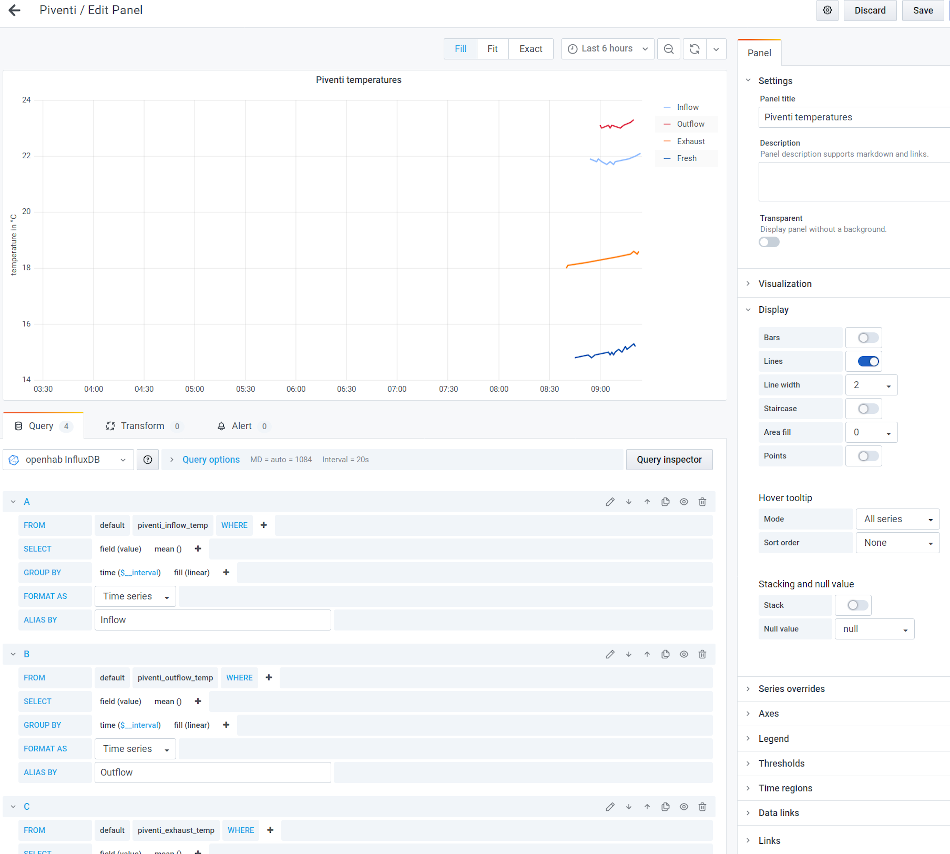
Click on the "Add panel" icon and then on "+ Add new panel". Give the panel a title. Now we can add our Channels (Items) in the "FROM" field. For fill "previous" is a good choice to avoid gaps between the data points. We can customize our graph as needed, choosing lines or bars, the line thickness or colour, the axes text, the legend etc.. Don't forget to save.
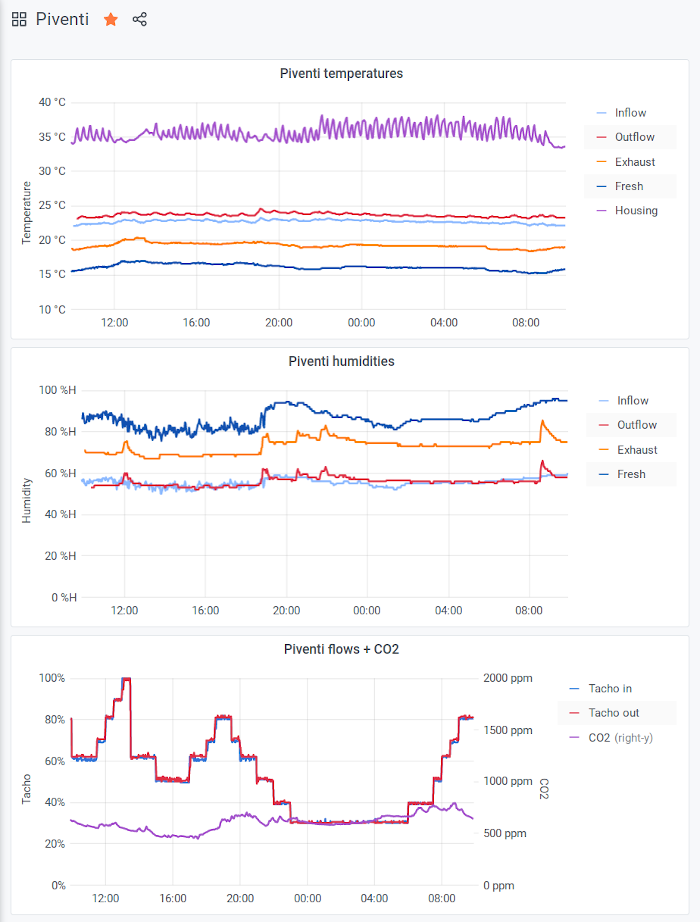
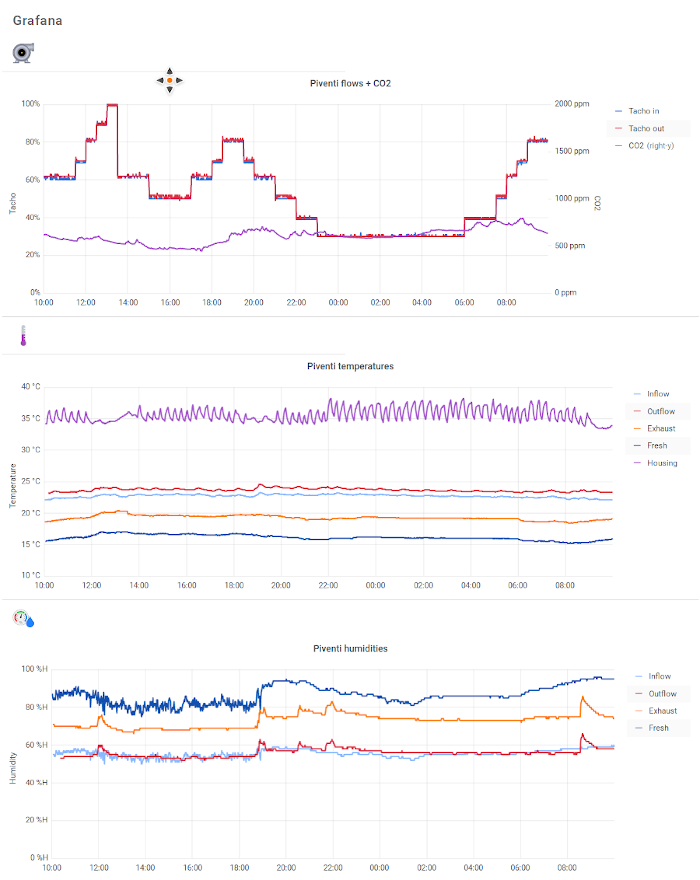
After playing around a little bit, the dashboard could have the following aspect:
We are also able to integrate Grafana dashboard graphics in our sitemap using a "Webview" object. With the code from=...&to=... we can adjust the time frame.

And here the result:
Other things for our home server
Install paho-mqtt for python programs
    sudo apt install python3-pip
    sudo pip3 install paho-mqtt
    sudo apt install gnuplot
Install ssmtp for mailing
For mailing you have to install ssmtp (needed), mpack (for attachments) and berhaps mailutils (not mandatory):
sudo apt install ssmtp mailutils mpack
With your editor you have to set up the defaults for SSMTP in /etc/ssmtp/ssmtp.conf. Edit the fields:
    root=my@mail.adr
    mailhub=smtp.xxx.xx:587
    hostname=localhost
    rewriteDomain=www.xxx.com
    FromLineOverride=YES
    AuthUser=youruserid
    AuthPass=xxxxxxxxxxxx
    UseSTARTTLS=YES
Test your mail with:
echo "Hello world email body" | mail -s "Test Subject" my@mail.adr
https://github.com/airix1/openhabnano/blob/master/openhab.nanorc /usr/share/nano/openhab.nanorc
For troubleshooting:
https://www.openhab.org/docs/administration/logging.html
Interesting links:
- a book on openHAB 2 in German:
https://www.amazon.de/Smart-Home-openHAB-Heimautomation-Open-Source-L%C3%B6sung/dp/3836259761/ - a book on IoT security in German: https://www.amazon.de/dp/3864903432
- two books on IoT security in English:
https://www.amazon.com/Abusing-Internet-Things-Blackouts-Freakouts/dp/1491902337
https://www.amazon.com/IoT-Hackers-Handbook-Practical-Internet/dp/1484242998 - Generic MQTT device: https://www.openhab.org/addons/bindings/mqtt.generic/
- JSONPath: https://www.openhab.org/addons/transformations/jsonpath/
- Rules: https://www.openhab.org/docs/configuration/rules-dsl.html
- Things: https://www.openhab.org/docs/configuration/things.html
- Items: https://www.openhab.org/docs/configuration/items.html
- Sitemaps: https://www.openhab.org/docs/ui/sitemaps.html#sitemaps
- Xtend expressions: https://www.eclipse.org/xtend/documentation/203_xtend_expressions.html
- InfluxDB installation instructions: https://docs.influxdata.com/influxdb/v1.6/introduction/installation/
- Logging InfluxDB: https://docs.influxdata.com/influxdb/v1.6/administration/logs/
