Single board computer projects
PiPyRadio: Revive old Radio with a Raspberry Pi
last updated: 2024-11-18
Quick links
- Intro
- Set up the Pi
- PiPyRadio Software
- Adding a bluetooth receiver
- My kitchen radio
- Downloads
- Interesting links
Intro
My old Kitchen Radio can broadcast only few radio stations because of the limited antenna. An USB receiver connected to "AUX" helps but is not really satisfying because of the time needed to connect the tablet or handy.
I still had some older Raspberry Pi's and also a display and even an unused DAC hat. So let's go.

Set up the Pi
Burn the newest OS with the Raspberry Pi Imager. I use the standard 32 bit OS with Desktop, because I love VNC and Thonny to program. You can set the hostname (pipyradio), the ssh access, the wireless lan etc. in the Imager (gear) before writing to the SD card.
I use an Raspberry Pi 3+ with a 5" HDMI display (800*480) and a PiFi DAC+ v2.0 hat, but other should also be ok. An USB bluetooth dongle helps to add a bluetooth receiver. The net tells that the internal bluetooth chip is not reliable. It seems even good to connect the stick with a cable extension to USB to avoid interference with the Raspi.
BOM
- Raspberry Pi (e.g. 3+)
- Touch display (e.g. HDMI 5" 800x480)
- Raspi DAC Hat (e.g. PiFi DAC+ v2)
- Bluetooth USB dongle
Static IP
We want a static ip to access the pi, so we add the following lines to the file /etc/dhcpcd.conf
    interface wlan0
    static ip_address=192.168.1.100/24
    static routers=192.168.1.1
    static domain_name_servers=192.168.1.1 8.8.8.8
Next we update the software, install the midnight commander (I love mc) and use raspi-config to expand the filesystem (6 Advanced Options A1) , enable VNC (Interface Options I3) and set the VNC resolution to the highest value (2 Display Options D5).
    sudo apt update && sudo apt upgrade
    sudo apt install mc htop
    sudo raspi-config
Screen Resolution
After an upgrade to bookworm, I had a blank screen. My settings in /etc/config.txt to force a resolution of 800x480 were no longer valid. I had to use dtoverlay=vc4-kms-v3d driver to get the screen to work.
dtoverlay=vc4-kms-v3d was commented because it blocked the sound. Fortunately by adding noaudio: dtoverlay=vc4-kms-v3d,noaudio we can switch the native audio off.
After this the screen worked (I use X not Wayland), but the needed resolution was not available (check with xrandrcommand). The trick to add a resolution is to add the following text to the long line in boot/cmdline.txt (or boot/firmware/cmdline.txt).
video=HDMI-A-1:1024x600M@60D
Spaces separate the items.
Enable the DAC Hat
In the next step we have to tweak some things in the config.txt filer that resides in the /boot or /boot/firmware folder.
sudo nano /boot/config.txt
With the comment char (#) we switch the internal audio off and with noaudio we disable HDMI output:
    #dtparam=audio=on
    dtoverlay=vc4-kms-v3d,noaudio
For the Audio hat we switch on resp. add:
    dtparam=i2s=on
    dtoverlay=hifiberry-dacplus
Save with Ctrl+s and exit with Ctrl+x.
After a reboot we can test the audio shield with:
speaker-test -c2 -twav -l7
If there are problems with the volume test:
alsamixer
Add the Music Player
Now we install the Music Player Daemon (mpd), the software that is able to stream the internet radios and a minimal command line tool (mpc):
sudo apt-get install mpd mpc
Look if the daemon is running with:
systemctl status mpd.service
If not start the service:
systemctl start mpd.service
Here some commands to test mpc:
    mpc help
    mpc add http://sc-eldolive.newmedia.lu
    mpc play
    mpc stop
    mpc clear # to get new url
    mpc status
With add we add a station to the queue and with clear we remove all entries from the queue.
For me the sound didn't work out of the box and I had to add the following lines to the music player daemon config file /etc/mpd.conf.
sudo nano /etc/mpd.conf
    audio_output {
        type            "alsa"
        name            "My ALSA Device"
        device          "hw:1,0"        # optional
        mixer_type      "software"      # optional
    }
On another pi the sound worked, but the volume didn't work. I added the 4 lines, but the device was "hw:0,0".
Save with Ctrl+o and exit with Ctrl+x.
Avoid connection problems
Power save sometimes switches the WiFi off, when it thinks the Raspi is inactive.
With the following commands we can read the current power save state, and disable power_save.
    /sbin/iw wlan0 get power_save
    sudo /sbin/iw wlan0 set power_save off
we can disable power save.
Since the iw command is not persistant, we must add the following line to /etc/rc.local right before exit 0 to be sure power_save is off after startup.
sudo nano /etc/rc.local
/sbin/iw wlan0 set power_save off
Save with Ctrl+o and exit with Ctrl+x.
PiPyRadio Software
The Software is on github (https://github.com/weigu1/PiPyRadio)
The Python software folder has 4 files:
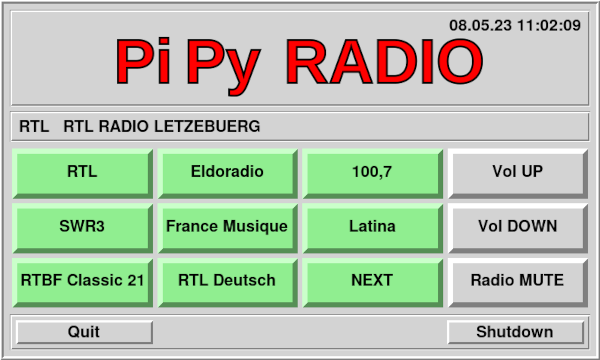
pipyradio.py, the main programpipyradio_gui.py, the GUI modulepipyradio_488.png, the header image fileradio.stations.txt, the radio station text file
In the main program we can adjust some things:
    my_dir = "/home/weigu/PiPyRadio/"  # Change according your path
    stations_txt_file = my_dir + "radio_stations.txt"
    image_file = my_dir + "pipyradio_488.png"
    station_playing_nr = 1
    volume = 65 #0-100
The path must point to the 4 files, so that the program can find the image and station files. The image file can be replaced by another image fitting in the header. We can decide witch station is playing when the program starts, and set also the starting volume.
The radio_stations.txt file has the following format:
    RTL|http://sc-rtllive.newmedia.lu:80/
    Eldoradio|http://sc-eldolive.newmedia.lu
    100,7|http://100komma7.cast.addradio.de/100komma7/live/mp3/128/stream.mp3
    SWR3|https://liveradio.swr.de/sw282p3/swr3/play.mp3
    France Musique|http://direct.francemusique.fr/live/francemusique-midfi.mp3
The first part is the name of the station, displayed on the button, so it should not be too long. After the | seperator comes the streaming URL that you must find in the Internet :).
There ist no limitation with the number of stations.
Start the software after reboot
We must start the Python program only after the GUI has started. So we don't add a line to /etc/rc.local but to /etc/xdg/lxsession/LXDE-pi/autostart. Add the following line:
sudo nano /etc/xdg/lxsession/LXDE-pi/autostart
@/usr/bin/python3 /home/weigu/PiPyRadio/pipyradio.py
Save with Ctrl+o and exit with Ctrl+x.
Adding a bluetooth receiver
Sometimes we want to stream over bluetooth using our phone or tablet. To use a bluetooth receiver we add an bluetooth stick as mentioned above. Now we need the software (Thanks to nicokaiser).
We download the compressed project files with the wget command and unzip the zip file. Then we remove it and change to the new directory to install the software with a script:
    wget -q https://github.com/nicokaiser/rpi-audio-receiver/archive/main.zip
    unzip main.zip
    rm main.zip
    cd rpi-audio-receiver-main
    sudo ./install.sh
The hostname is the name of our pi (pipyradio) device itself, and the pretty Name is what we'll actually see in our bluetooth listing when trying to connect. Bluetooth Audio (PulseAudio) needs to be installed (y). Shairport Sync AirPlay 1 Audio Receiver and Spotify Connect are optional.
If we have an external stick, we need to disable the internal bluetooth chip, add the following line to /boot/config.txt:
sudo nano /boot/config.txt
dtoverlay=disable-bt
Save with Ctrl+o and exit with Ctrl+x.
After this we have to reboot:
sudo reboot
Now we can setup the receiver with:
sudo bluetoothctl
We enter the following commands:
    power on
    discoverable on
    pairable on
    exit
My kitchen radio
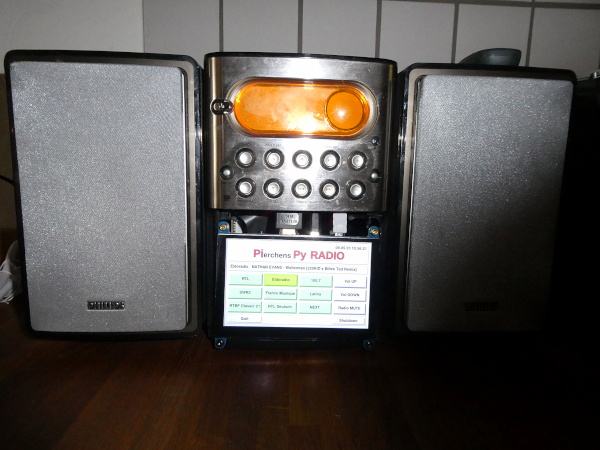
In my old Phillips kitchen radio (MC-M250) that I bought 20 years ago, I removed the cassette part. This gave me enough place inside, to add the Raspberry Pi and the audio hat. Still missing a blend from my 3D printer to to cover the cable connections.

Downloads
Interesting links
- https://wiki.ubuntuusers.de/Internetradio/Stationen/
- https://kb.plugable.com/en_US/audio/pluga-project-raspberry-pi-bluetooth-audio-receiver
- https://www.instructables.com/Raspberry-Pi-Internet-Radio-With-Flask/
