Tutorials:
Sensors, interfaces and bus systems (SENIN, BUSSY)
Using a home automation software
last updated: 2023-12-06
Quick links
- Introduction
- Install openHAB inside a Docker container on Linux (debian)
- A brief overview of openHAB
- Using Z-Wave devices in openHAB
- Using the MQTT Things in openHAB
- Rules in openHAB
- Graphs
- Adding Things, Channels and Items using manual definition in configuration text files
- Don't forget the people!
- Using InfluxDB database and Grafana to create charts
- Interesting links
- Appendix A: Install openHAB directly on debian (no docker)
Introduction
Song of this chapter: Madness > Our house
In the market of IoT devices we have many proprietary solutions. To understand how automation software for buildings work we will look in depth into one software designed for homes that is powerful in combining many proprietary protocols. The software is called openHAB, is open source and thus helps to understand the principles of building automation in depth. The documentation of openHAB is excellent, and there exists a big supporting community.
OpenHAB
OpenHABis easily extendable and regroups other home automation systems, devices and different technologies like e.g.KNX,HomeMatic,Philips Hueand protocols or interfaces like e.g.MQTT,XBEEormodbusinto a single solution.OpenHABprovides also a uniform user interface and a common automation rules across the entire system. This regardless of the number of manufacturers and sub-systems involved.OpenHABdoes not need an external cloud, so the data can be secured in an local subsystem.
OpenHAB stands for open Home Automation Bus and is developed in Java, so it runs an all platforms. The newest stable Version is 4.0.4 (12/2023). There are big changes in V3.x AND v4.x from versions 1.x or 2.x so pay attention if you search the net to get content for V4.x.
The newest documentation can be found on openhab.org/docs.
The good documentation of openHAB is one of the reasons why openHAB was preferred over other house automation systems (iobroker, home assistant, fhem, ...) in this tutorial.
OpenHAB is very powerful and flexible but has a steep learning curve. So let's start :).
We will install openHAB on a Raspberry Pi. This facilitates the installation procedure and the Raspberry Pi is a cheap and powerful possibility to use openHAB. Naturally it is also possible to install openHAB on a NAS or server or PC.
Install openHAB inside a Docker container on Linux (debian)
The simplest method to install openHAB is a Raspi image with openhab, that can be found in the Raspberry Pi Imager:
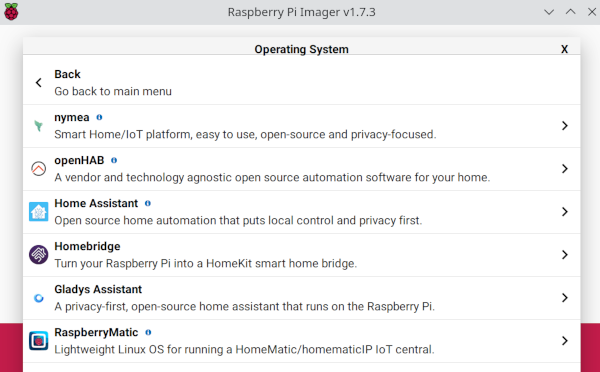
To be more flexible with the platform, you could install openHAB with the packager of your Distro. More infos in https://www.openhab.org/docs/installation/linux.html.
We will not install openhab directly on the Raspberry Pi, but we will use a Docker container to do so. If you want a direct installation, look at the end of this page (Appendix A).
A Docker container allows an easy installation without worrying about e.g. the right Java environment. We can easily test out different versions (multiple instances running side by side) and we can easily map the openHAB ports to other ports without modifying anything.
More on infos on docker: https://www.weigu.lu/sb-computer/docker/index.html and on the openHAB container: https://hub.docker.com/r/openhab/openhab.
Install Docker engine and Docker compose on Debian (bullseye)
After an update of our pi, we download a script and execute it. The script will do all the hard work ;) and install docker.
    sudo apt update && sudo apt upgrade
    curl -fsSL https://get.docker.com -o get-docker.sh
    sudo sh get-docker.sh
Test if Docker is working:
sudo docker run hello-world
If we want to run a container without sudo we get an error. We want to use docker also as a non-root user (without sudo), so we need to add our user to the docker group. Use the following commans:
    sudo usermod -aG docker $USER
    newgrp docker
    docker run hello-world
Docker command lines can get big if we configure many parameters. So we will use Docker compose to call our container. Docker Compose is a tool for defining and running multi-container Docker applications. Docker compose uses a YAML text file to run the different container. More infos: https://docs.docker.com/compose/ and https://github.com/docker/compose. After configuring the YAML file Docker-compose allows to create and start all the services with a single command.
The script installed already docker compose. If yo need to do it without script, the command is:
sudo apt install docker-compose-plugin
Test the installation.
docker compose version
Now let's have a look at the YAML file we will use:
    # save as docker-compose.yml or openhab.yml
    version: '3.8'

    services:
      openhab:
        image: "openhab/openhab" # latest stable
        container_name: openhab
        restart: always
        network_mode: host
        volumes:
          - "/etc/localtime:/etc/localtime:ro"
          - "/etc/timezone:/etc/timezone:ro"
          - "./openhab/openhab_addons:/openhab/addons"
          - "./openhab/openhab_conf:/openhab/conf"
          - "./openhab/openhab_userdata:/openhab/userdata"
        devices:
          - /dev/ttyAMA0:/dev/ttyAMA0
          - /dev/ttyACM0:/dev/ttyACM0
        environment:
          OPENHAB_HTTP_PORT: "9080"
          OPENHAB_HTTPS_PORT: "9443"
          EXTRA_JAVA_OPTS: "-Duser.timezone=Europe/Luxembourg"
We use the network of the host, because openHAB requires UPnP discovery. Unfortunately port mapping is incompatible with this network_mode. Because we may use 2 versions of openHAB, we change the ports from 8xxx to 9xxx. The openHAB directories are created from docker-compose.
The devices ttyACM0 and ttyAMA0 are mapped, so we can access later our Z-Wave sticks. Connect the Z-Wave stick to your USB socket before continuing!
We save the file as text-only with the name openhab.yml in our home folder and start it with the following command:
docker compose -f openhab.yml up --remove-orphans -d
Without -f and the filename docker-compose searches for a file named docker-compose.yml in the current directory. The option -d stands for detached mode, meaning the container is running in the background (default = foreground).
To stop or (re)start the running container we use:
    docker compose -f openhab.yml stop
    docker compose -f openhab.yml start
Now you find openHAB on your Raspberry Pi by using the IP address and the port in a browser e.g. 192.168.130.160:9080.
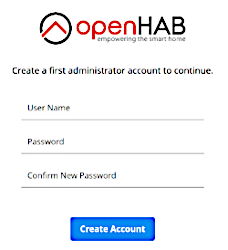
Using the openHAB karaf console
The openHAB console offers the option to monitor the log in real time and to execute runtime commands. So it may be good to know it exists.
The connection is only allowed from localhost (machine running openHAB) due to security concerns . We could access the console in a normal installation with:
openhab-cli console
As we work in a container, we need the exec command of docker to access the console in the container:
docker exec -it openhab /openhab/runtime/bin/client
The default password is: "habopen".
The most useful command is help (q to quit). It lists all the other commands. When finished with the console you get out with logout (or Ctrl-D).
Example to view all active add-ons using MQTT:
bundle:list |grep -i MQTT
To view the log in real-time:
log:tail

The log files can also be found in our home directory in the folder ~/openhab/openhab_userdata/logs.
"Just do it" OpenHAB 1:
Install openHAB as docker container on a Raspberry Pi. Test the openHAB karaf console. Lock at the commands with
help. Test the real-time logging (document this with a screenshot).Read the following documentation:
https://www.openhab.org/docs/
https://www.openhab.org/docs/tutorial/
and create an Admin User and set your location like described in this document:
https://www.openhab.org/docs/tutorial/first_steps.html.Here a demo page to show what openHAB can do: https://demo.openhab.org/#!/. Try it out (click everywhere!).
A brief overview of openHAB
OpenHAB has a great documentation: https://www.openhab.org/docs/.
The openHAB homepage called MainUI
OpenHAB V3.x uses unless previous versions a new unified user interface (called MainUI). Almost everything that can be configured in openHAB can be configured through MainUI as administrator. A normal user instead sees only the interactive pages.
After the installation we can access our openHAB "homepage" with an internet browser on port 9080 of our Raspberry Pi, with the Raspi IP:9080 (e.g.: 192.168.1.100:9080) or the hostname.local:9080 (e.g. pi-openhab.local:9080/).
If you have no own hostname, use sudo raspi-config or the Preferences > Raspberry Pi Configuration menu in the UI of your Raspi to attribute a hostname.
After attributing an admin user and tough password :) we run the setup assistant to define the Region, the TimeZone and if you want the Location (you can also skip these screens, and configure things later).

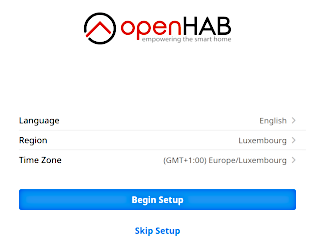
Bindings
The Raspberry Pi is our openHAB server. We want to connect our devices, called Things in openHAB with the openHAB server to be able to manage them.
Devices need a "driver" called a Binding in openHAB. Bindings integrate physical hardware, web services and external systems in openHAB (in the first version of openHAB they were called "Add-ons"). All Bindings can be found on: https://www.openhab.org/addons/ (click on all :). With a click on the Binding Icon we get all the information on the binding!
Some of openHAB Bindings

A Binding is installed in our homepage. After clicking on the "hamburger" we click on Settings to access the Settings page.
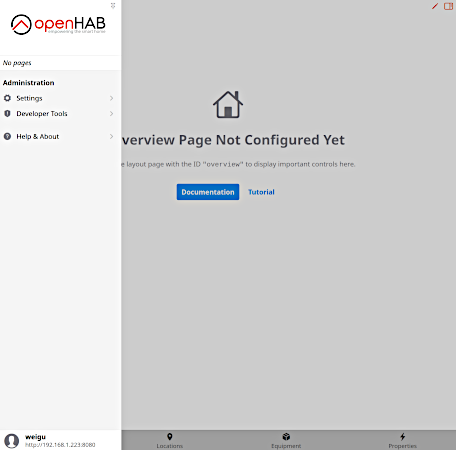
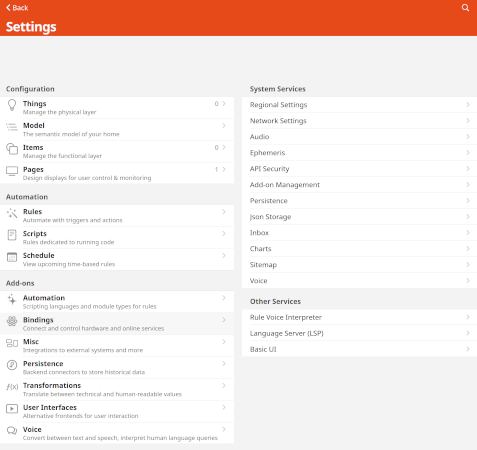
Here we find the Bindings page and add Bindings by clicking on the + sign.
Things
Things (https://www.openhab.org/docs/configuration/things.html) in the openHAB language are physical entities like devices, but also web services or information sources. Devices like actuators, sensors, cameras, lamps etc.. can sometimes be connected directly, but often they use proprietary (wireless protocols) and connect with these protocols to a bridge (also named gateway or hub). The bridge is then connected to openHAB (e.g. Homematic, Philips Hue, LoRaWan).
After the installation of the Binding, we can add our Things (Settings page). As with Bindings this can be done in by using the + sign in the Things page.
Often things can be discovered automatically by openHAB. If this does not work, we can do it manually. New detected Things are shown in Inbox and can then be added.
Thing Channels
A Thing has often more than one possibility to interact. In openHAB these possibilities are called Channels. E. g. an integrated motion sensor has 5 Channels: a switch notifying motion, a temperature sensor, a luminance sensor an alarm switch and a battery level indicator.
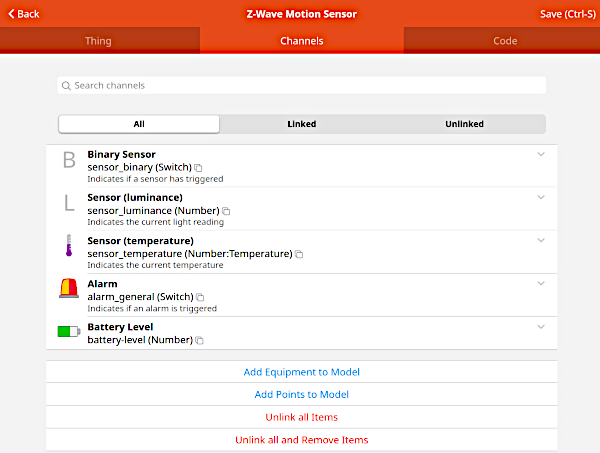
Thing Status
Each Thing has a status object. This helps to identify possible problems. The following statuses are possible: UNINITIALIZED, INITIALIZING, UNKNOWN, ONLINE, OFFLINE, REMOVING and REMOVED. The status object has a status detail object witch gives even more information. More infos on status transition and the status objects can be found here.
"Note: Battery powered devices will be discovered, but may remain as an "unknown" type until the device has woken up enough for the binding to discover what it is. On it's own, this process can take days. To speed up the process activate the device several times until the Thing shows the correct device type." (source: https://www.openhab.org/docs/tutorial/things_intermediate.html)
Items
Bindings and Things belong to the the physical world. The whole concept of the application openHAB is built around the notion of Items. Items are decoupled from the physical things and play on a virtual layer. Items can be strings, numbers, switches and can be compared with base variable data types of a programming language.
Items always have a state and some of them can be manipulated through events. They represent all properties and capabilities of the user’s home automation. They also represent functionality that is used by MAINUI or our automation logic (rules).
Often an Item is connected with a concrete Channel of a Thing. So the Item does not only store information set by software (e.g., ON, 247 or "Hello") but can also take action on the physical level. Items can be represented in Pages and can be grouped to create new logical Items (group Items, e.g. all the temperatures of a floor). Al the rules in openHAB will be based on Items and their status changes.
Items can be manipulated in MainUI (Settings > Items).
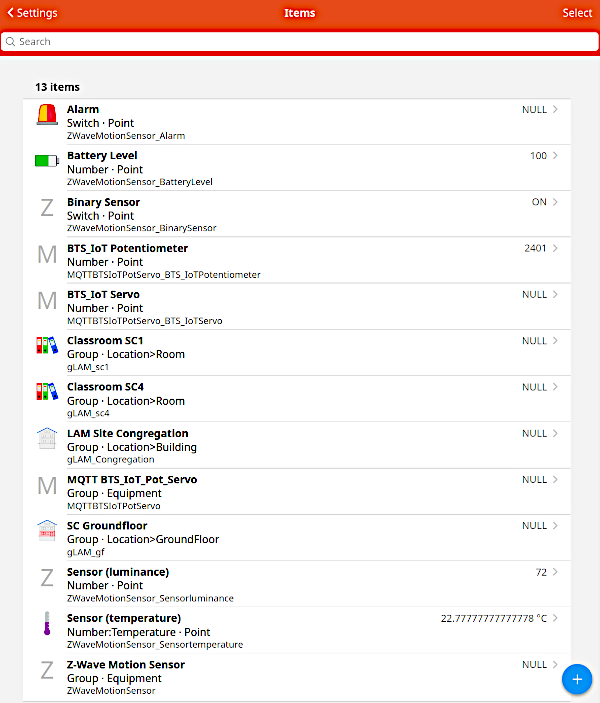
By clicking on the Item we see some of the Items properties. By clicking on Edit we can change these properties.
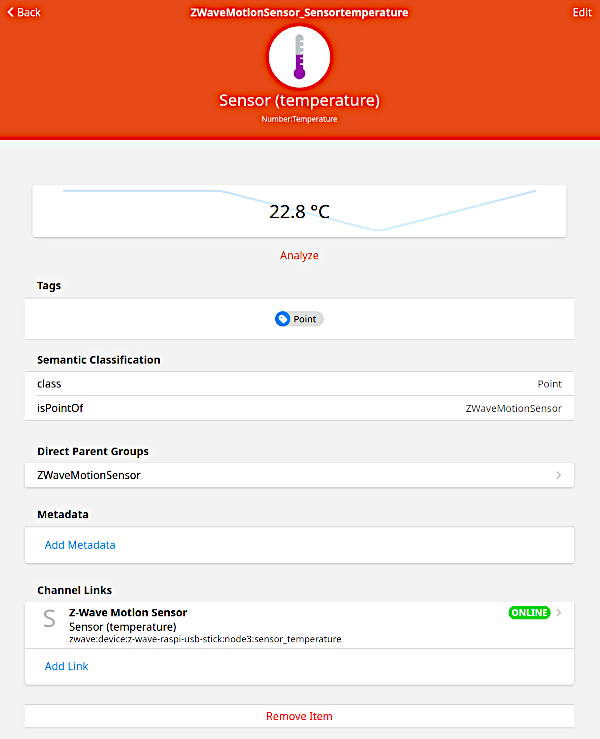
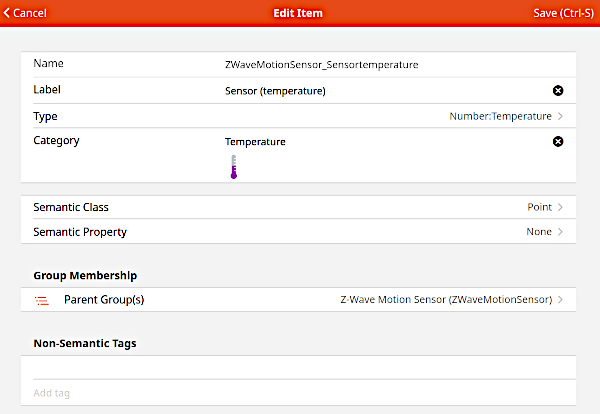
After editing we must click on Save! Let's have a closer look properties of Items.
Items enable us to apply meaning to our devices. Instead of working with cryptic links like "zwave:25789463:node2:motion" we can deal with "Classroom_Temperature". Items are the main entities that openHAB needs to create Pages (Sitemaps), Rules, and Persistence.
The properties Name and Type are obligatory. The other properties are optional. The Label can be displayed in Pages. The Category defines the icon that should be used in the Pages. You can create your own icons (png,svg) and save them under /etc/openhab2/icons/classic.
Important is the Item Type. It defines what sort of state and what sort of commands the Item can receive. We have to choose one of the Basic Types.
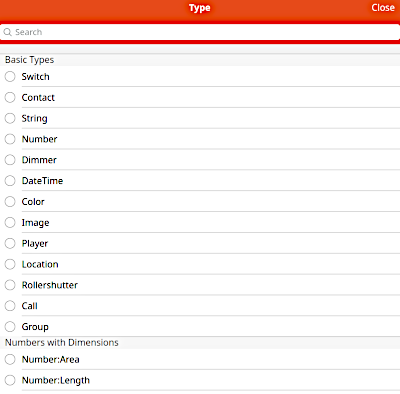
Table of Basic Item types:
| Item Type | Description | Command Types |
|---|---|---|
| Switch | Typically used for lights (on/off) | OnOff |
| Contact | Item storing status of e.g. door/window contacts | OpenClosed |
| String | Stores texts | String |
| Number | Stores values in number format, takes an optional dimension suffix | Decimal |
| Dimmer | Item carrying a percentage value for dimmers | OnOff, IncreaseDecrease, Percent |
| DateTime | Stores date and time | - |
| Color | Color information (RGB) | OnOff, IncreaseDecrease, Percent, HSB |
| Image | Holds the binary data of an image | - |
| Player | Allows to control players (e.g. audio players) | PlayPause, NextPrevious, RewindFastforward |
| Location | Stores GPS coordinates | Point |
| Rollershutter | Typically used for blinds | UpDown, StopMove, Percent |
| Call | ||
| Group | Item to nest other Items / collect them in Groups | - |
| Number:dimension | like Number, additional dimension information for unit support | Quantity |
source: https://www.openhab.org/docs/concepts/items.html
Often an Itemtype is a number. Here we can add a dimension to define the Item. A temperature Item get's the type Number:Temperature.
The available dimensions are:
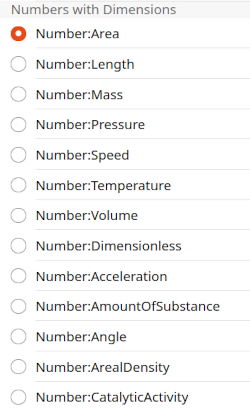
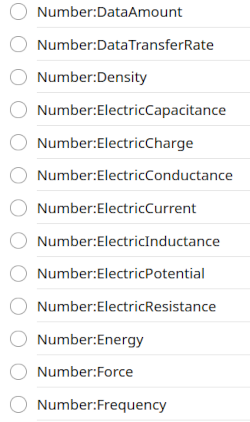
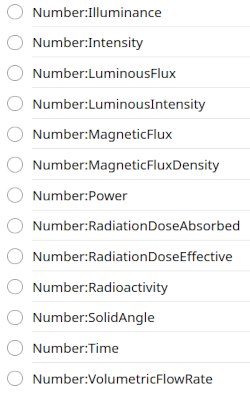
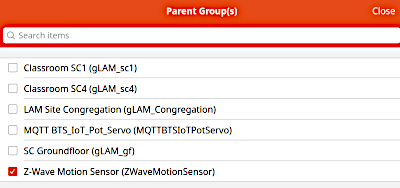
Items can be members of a group. Our temperature channel is member of the Z-wave motion detector.
New in openHAB is the Semantic Model (next chapter). Any item need not but may have a Semantic Class or a Semantic Property.
Items are stored like Things in JsonDB files (/var/lib/openhab). In the previous versions of openHAB they were manipulated in a text file with the extension .items under /etc/openhab/items.
Groups
Groups Items that are needed to collect other Items in groups. Groups can be used to trigger a rule when an event is received by one of it's members. Groups can represent the mean value of all the members values or the the max value of all it’s members. Also commands to a Group will be forwarded to all of it’s members.
In the semantic model they regroup items (e.g. other Groups or Equipments) of the same location.
Semantic Model
OpenHAB uses now a semantic model (type of equipment, descriptions for location, ...) to organize Items and to automatically create Pages respectively to provide natural language interaction. So it is important to create a good semantic model right at the beginning and to stick to it. This makes life easier and the time invested to understand and choose a logical structure for your project will gain time later.
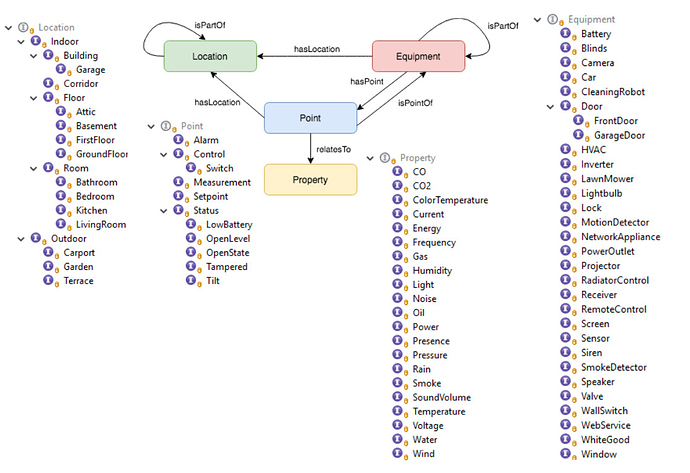
The Model is based on 4 main concepts:
Location: Group Item that can contain sub-Locations, Equipment, and Points. It represents a physical location (e.g a building or a room).Equipment: Group Item that can contain sub-Equipment, and Points.Point: Item (Basic type not group) usually linked to a Channel.Property: Additional tag on a Point Item to clarify what sort of point it is.
So Location and Equipment Groups are regrouping other Items. Points are mostly Channels of Things.
We get the some restrictions that are obvious because the model represents the physical. An Equipment or a Point cannot be in more than one location at the same time respectively a Point cannot be a part of more than one Equipment at the same time. So:
- A Location can only be the direct member one Location Group.
- An Equipment can only be the direct member of one Location, or one Equipment.
- A Point can only be the direct member of one Location, or one Equipment.
It is important to understand, that the semantic model has no impact on basic things. It is just a way of logical structuring the items, e.g. for creating the UI, also not all Items (e.g. Groups) need to be a part of the model. Unfortunately some words used in the Semantic Model are the same as the Items Types like Location and Switch, but they have nothing to do with each other. E.g a Location Item Type indicates that the Item stores coordinates (latitude, longitude). A Location tag in the model is a way to indicate that a specific Item (Group Type) represents a “location” in the model.
As shown in the docs, not all Groups need to be a part of the model (e.g. Groups needed to make rules).
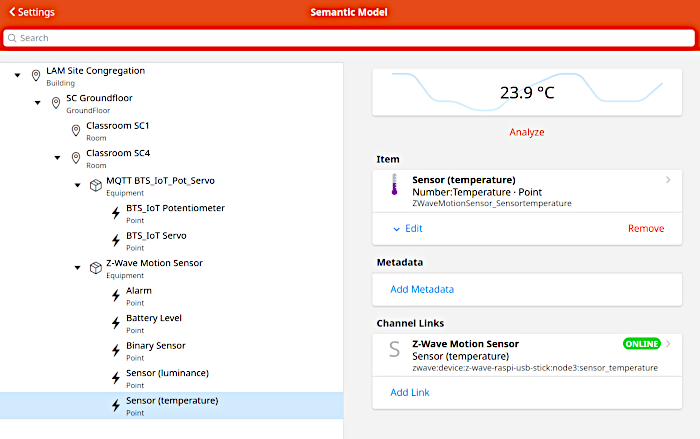
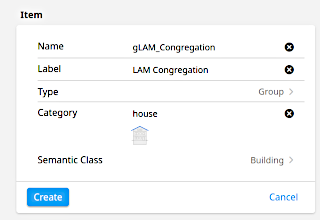
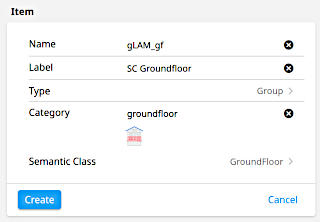
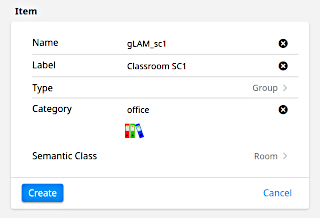
"Just do it" OpenHAB 2:
- So let's start and begin to create our Semantic Model. First read the docs on the semantic model: https://www.openhab.org/docs/tutorial/model.html. Then create a Model like in the picture above containing the building, the groundfloor and 2 classrooms (the Equipment and Points will be added later in this chapter).
Transformations
Transformations are used to e.g. + convert Json Strings to values needed by rules + convert values to a human-readable representation with units + translate things to another language + to convert values to another unit (e.g. TJ to kWh)
More infos in the docs: https://www.openhab.org/docs/configuration/transformations.html
Persistence
OpenHAB can store data over time. This is called in openHAB persistence. This data can be used later in rules, or to restore the system after startup, or to draw graphs over time. The default persistence service in openHAB is rrd4j using a round-robin database. The service is running all the time and stores every state change at least once a minute and also restores data at startup.
You are free to another database (e.g. InfluxDB) or more database in parallel.
Rules
Rules are the heart of an home automation system. Rules are triggered by an event or change, and invokes a script that performs any kinds of tasks (e.g. turn on lights, do calculations, start a timer ...).
Rules can be created and edited with in the GUI. In OpenHAB we can use Blockly and write the code (script) of our rules by using visual blocks. As this is better suited for beginners and simple rules.
More advanced scripting is possible with XTEnd, or [JSR223]((https://www.openhab.org/docs/configuration/jsr223.html#jsr223-scripting). JSR223 is a standard scripting API for Java Virtual Machine (JVM) languages. Currently the following languages are known to work well for openHAB scripting: Apache Groovy (JVM scripting language), JavaScript, Ruby, and Jython (Python on the JVM).
Pages
The new unified user interface (called MainUI) has built-in pages. It will automatically generate an Overview page, that cannot be deleted, but it can be customized.
This Overview page has four tabs: Overview, Locations, Equipment, and Properties (look at the demo page).
Pages can be built automatically through the semantic model. But we can also add Pages at will and customize them as desired.
Sitemaps (not used here)
Sitemaps are another tool to create dash boards, that was used mainly in previous versions of openHAB. The result of a Sitemap can be viewed with the application BasicUI (accessible via the "other apps" icon in the top right corner of the Overview page).
Sitemaps are text files with the extension .sitemap and they are stored under /etc/openhab2/sitemaps.
We will not use sitemaps.
Short recap
| Bindings (Add-Ons): | A sort of "drivers" needed to communicate with the devices (Things). |
| Things (Configuration): | Your physical devices represented in openHAB. |
| Channels: | Things (physical devices) have one or more Channels. They are needed to interact with the Things. |
| Items (Configuration): | Properties and capabilities linked to the Channels of your Things. |
| Groups: | Collections or categories containing Items. |
| Transformations (Add-Ons): | Helper functions to transform your data. |
| Persistence (Add-Ons): | Services to store data over time. |
| Rules (Automation) | Automation logic, the “smart” in your Smart Home! |
| JSR223 Scripting | Define rules and other runtime objects using Javascript, Jython, Groovy or JRuby. |
| Sitemaps: | User-defined front-end interfaces to arrange Groups, Items, ... |
In the Main UI we can do practically everything. Only the definition of Transformations and Persistence is done via text files.
OpenHAB has a great documentation: https://www.openhab.org/docs/. Use this documentation in parallel to this tutorial.
We will start with some Z-Wave devices. OpenHAB can Auto-Discover such devices, reducing the work to configure them. After the discover process, they can easily be managed in MainUI. The documentation to add Z-Wave devices can be found in the chapter: Adding things - Intermediate.
Using Z-Wave devices in openHAB
Z-Wave
Z-Wave is a wireless communications protocol operating with a throughput up to 40 kbit/s in the unlicensed Industrial, Scientific, and Medical (ISM) band of 868 MHz in Europe.
It is a mesh network using low-energy radio waves used primarily for home automation. In the mesh network, mains powered nodes can route messages between battery driven nodes. The network supports hop distances of up to four hops.
Communication distance between two nodes is about 30 meters. More about Z-Wave in the openHAB documentation.
Z-Wave allows interoperability between home control systems of different manufacturers (3200 products by 2022). A wide range of devices are supported and the Z-Wave certification guarantees that certified devices will be compatible with each other and the network. OpenHAB supports 1097 things from 145 manufacturers (2021).
Some of the following steps are also documented here: https://www.openhab.org/docs/tutorial/things_intermediate.html.
Z-Wave Binding
The Z-wave Binding uses a standard Z-Wave serial USB stick to communicate with the Z-Wave devices. There are many sticks available, and they all support the same interface so the Binding does not distinguish between them.
Go to MainUi > Settings > Bindings , search for the Z-Wave Binding and install it. After the installation finishes we go back to Settings. Our Z-Wave Stick is a Thing and is called a Bridge Thing. Click on Things, +, Z-Wave Binding, and Z-Wave Serial Controller.
It is a good idea to give the Z-Wave controller an ID that is not cryptic, but readable (e.g. "z-wave-raspi-usb-stick"). We can specify a location to find the server later in the floor-plan. We need to provide the used serial port to openHAB. To do so we look on our Raspberry Pi what number the stick got. The stick is a serial modem. If no other modems are connected the port is /dev/ttyAMA0 or /dev/ttyACM0. To check we can use:
sudo dmesg | grep tty
To be able to use the device without being root we write an udev rule. For this we check the Vendor ID and the Product ID of our Stick we use the list usb command.
sudo lsusb
Now we create a file with:
sudo nano /etc/udev/rules.d/50-zwave.rules
and copy the following text to this file (adjust the IDs if necessary.):
SUBSYSTEM="tty", ATTRS{idVendor}=="0658", ATTRS{idProduct}=="0200", MODE="0666", GROUP="dialout"
Reboot the Raspi.
After adding the serial device we now can create the Thing.
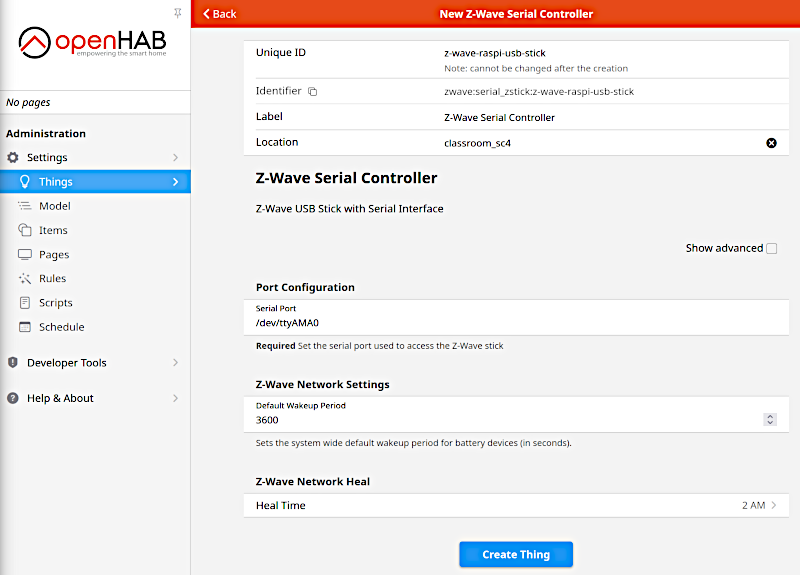
Adding Z-Wave Things
To detect our Z-Wave devices we click on Settings > Things > + > Z-Wave Binding > Scan. New detected devices are shown in Inbox. They are added by clicking on the check Add All.
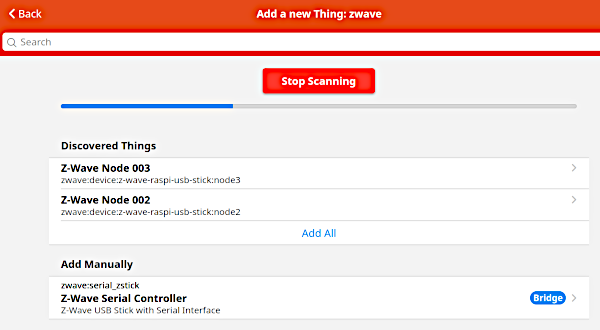
When we still have an "unknown" type (mostly battery driven devices) we must activate the device several times to get the correct device type (e.g. MT02647 Motion Sensor). After this is done we see in the Thing Tab all the properties of our device. Now we click on our Thing and give it a more meaningful Label than "node x" and a location. Click on save (right upper corner).
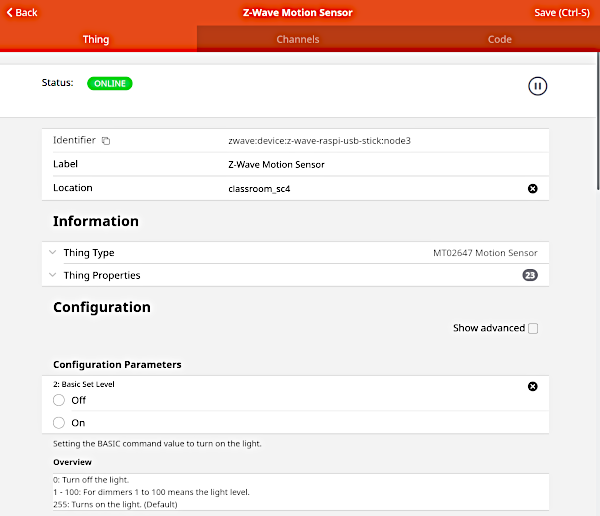
"Just do it" OpenHAB 3:
Add a Z-wave USB stick to your Raspberry Pi. Add the Binding and configure the stick (screenshot).
Now we will add 3 Z-Wave Things from Devolo to openHAB. This will be an MT02647 Motion Sensor, an MT02648 Door/Window Contact and an MT02792 Home Control Metering Plug. Read the inclusion and exclusion information in the in the openHAB Z-Wave documentation and the 3 documentations on the devices. Document with a screenshot.
Tipp1: For the motion sensor you have to press the switch on the back 3 times in 1.5 s.
Tipp2: For the door contact we have to change the Customer function (7) to "4", to get the contact working.
Document the MainUI Things screen after a successful inclusion and after changing to meaningful labels.

Linking Channels to Items and adding them to the semantic model
As already mentioned we get often more than one possibility to interact for a device (Thing). The channels have now to be linked with the internal represent from openHAB, the Items. Items as already seen define the properties and capabilities of the home automation.

Click on the channel and choose under Item Create a new Item.
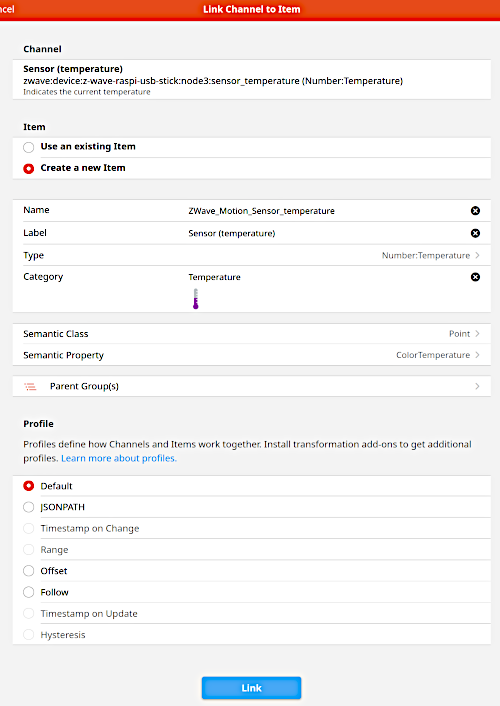
"Just do it" OpenHAB 4:
- Link all your Channels of your Z-wave devices with Items. For this you can use the semantic model(Create equipment from Screen). Add everything to classroom SC4. Document your full Semantic model screen.
"Just do it" OpenHAB 5:
- Read the docs about
Pages. Now let's create a page for the classroom SC4 containing our Z-Wave Items. Go toPagesand create a newresponsivelayout page (+ > Create layout). We give the page a meaningful Name and Label and make it visible in the sidebar. Then we create a block for each device (Thing). Inside the Block we arrange all our Items (channels) in rows and columns using different widgets. In the following picture we see an example for the Motion Sensor. Create the page with your 3 Z-Wave things and document your screen.
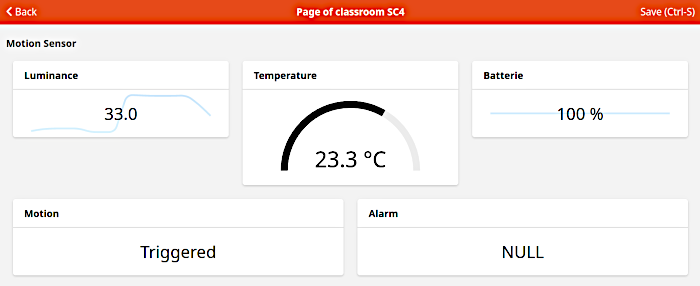
Using the MQTT Things in openHAB
As we built our own IoT devices publishing and subscribing by using MQTT we naturally want to add them to openHAB.
MQTT Binding
The following steps are also documented here: https://www.openhab.org/docs/tutorial/things_advanced.html.
We install a Binding (driver) for our mosquitto MQTT server. Click on Bindings, +, MQTT Binding and Install.
After the installation finishes we go back to Settings.
Our MQTT server is a Thing and is called a Bridge Thing. Click on Things, +, MQTT Binding, and MQTT broker.
It is a good idea to give the server an ID that is not cryptic, but readable (e.g. "mosquitto-sc4"). We can specify a location to find the server later in the floor-plan. OpenHAB needs to know at least the IP address (field Broker Hostname/IP) of our mosquitto server. Under Show advanced we can specify among others a unique client ID, a username and a password. Click on Create Thing.
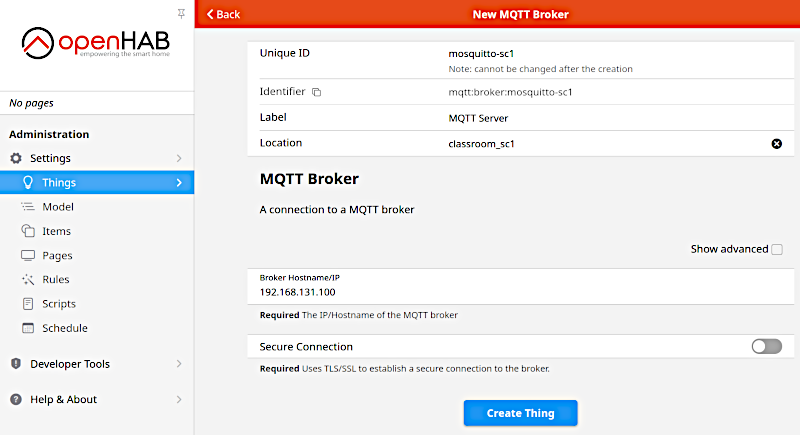
Now we are ready to add an MQTT device (Generic MQTT Thing).
Adding a generic MQTT Thing
ESP32 with potentiometer and servo
We need a device with a variable input and output to test MQTT on openHAB, so let's quickly built one.
A 10 kΩ potentiometer (variable resistance) will be connected to 3.3 V and deliver a voltage between 0 V and 3.3 V. The ADC of the ESP32 (GPIO 35) will convert this voltage with 12 bit in a value between 0 and 4095.
The actuator will be a servo. The value for the servo ranges from 0 to 180 corresponding to an angle of 0° to 180°. We need the PubSubClient library (knolleary) and the ESP32servo library (Kevin Harrington). Install both with the Tools > Manage libraries... .
Use this circuit and sketch:
    // mqtt_esp32_servo_pot.ino  weigu.lu
    // Using ESP32Servo (install with lib manager)
    // https://github.com/jkb-git/ESP32Servo

    #include <WiFi.h>
    #include <PubSubClient.h>
    #include <ESP32Servo.h>

    // WiFi and network settings
    const char* WIFI_SSID = "";
    const char* WIFI_PASS = "";

    // MQTT settings
    const short MQTT_PORT = 1883; // clear text = 1883
    const char *MQTT_SERVER = "192.168.131.100";
    const String MQTT_CLIENT_ID = "gen_mqtt_pot_servo_1";
    const String MQTT_TOPIC_OUT = "gen_mqtt_1/pot";
    const String MQTT_TOPIC_OUT2 = "gen_mqtt_1/pot_json";
    const String MQTT_TOPIC_IN = "gen_mqtt_1/servo";

    const byte PIN_POT = 35;
    const byte PIN_SERVO = 16;

    const unsigned long DELAY_MS = 3000; // time between sends in ms
    String Mqtt_Message, Mqtt_Message_Json;
    unsigned short pot_value = 0;
    int servo_pos = 0;    // 0-180° variable to store the servo position

    WiFiClient espClient;
    PubSubClient mqtt_client(espClient);
    Servo My_Servo;

    void setup() {
      pinMode(BUILTIN_LED, OUTPUT);           // Initialize the BUILTIN_LED pin as an output
      My_Servo.setPeriodHertz(50);            // see lib example
      My_Servo.attach(PIN_SERVO, 1000, 2000); // see lib example
      Serial.begin(115200);
      delay(100);
      setup_wifi();
      mqtt_client.setServer(MQTT_SERVER, MQTT_PORT);
      mqtt_client.setCallback(mqtt_callback);
    }

    void loop() {
      if (WiFi.status() != WL_CONNECTED)      // reconnect if no more WIFI present
        setup_wifi();
      if (!mqtt_client.connected()) {         // reconnect client if not yet connected
        mqtt_reconnect();
      }
      mqtt_client.loop();                     // make mqtt client live
      if (non_blocking_delay(DELAY_MS)) {
        pot_value = analogRead(PIN_POT);
        Mqtt_Message = String(pot_value);
        mqtt_client.publish(MQTT_TOPIC_OUT.c_str(), Mqtt_Message.c_str());       // value only
        Mqtt_Message_Json = "{\"Pot_value\":\"" + String(pot_value) + "\"}";
        mqtt_client.publish(MQTT_TOPIC_OUT2.c_str(), Mqtt_Message_Json.c_str()); // JSON string
        Serial.println("Published message: " + Mqtt_Message_Json);
      }
    }

    void setup_wifi() {
      Serial.print("\nConnecting to " + String(WIFI_SSID));
      WiFi.begin(WIFI_SSID, WIFI_PASS);
      while (WiFi.status() != WL_CONNECTED) {
        delay(500);
        Serial.print(".");
      }
      randomSeed(micros());
      Serial.print("\nWiFi connected\nIP address: ");
      Serial.println(WiFi.localIP());
    }

    void mqtt_callback(char* topic, byte* payload, unsigned int length) {
      servo_pos = atoi((char *)payload);
      Serial.print("Message on topic \"" + String(topic));
      Serial.print("\": value = ");
      Serial.println(servo_pos);
      My_Servo.write(servo_pos);
    }

    void mqtt_reconnect() {
      while (!mqtt_client.connected()) {      // Loop until we're reconnected
        Serial.print("Attempting MQTT connection...");
        if (mqtt_client.connect(MQTT_CLIENT_ID.c_str())) { // Attempt to connect
          Serial.println("connected");
          mqtt_client.publish(MQTT_TOPIC_OUT.c_str(), "reconnected");
          mqtt_client.subscribe(MQTT_TOPIC_IN.c_str());// ... and resubscribe
        } else {
          Serial.println("failed, rc=" + String(mqtt_client.state()) + " try again in 5 seconds");
          delay(5000);
        }
      }
    }

    bool non_blocking_delay(unsigned long milliseconds) {
      static unsigned long nb_delay_prev_time = 0;
      if(millis() >= nb_delay_prev_time + milliseconds) {
        nb_delay_prev_time += milliseconds;
        return true;
      }
      return false;
    }
Now we will add a the Generic MQTT Thing. Go to Things, click the + , MQTT Binding and than on the Generic MQTT Thing.
Change the ID to something meaningful and give a Label. The location will be added later in the Model. Choose the MQTT Broker as Bridge and create the Thing.
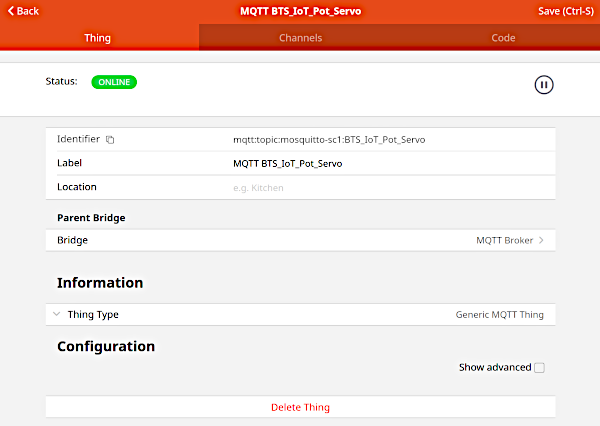
Adding the channels
Next we need channels to define our topics. Click on the Channels tab and than on Add Channel. Each Channel has a Channel type. Possible types are:
- Text Value
- Number Value
- Percentage Value
- On/Off Switch
- Open/Close Contact
- Color Value (Red,Green,Blue)
- Color Value (Hue,Saturation,Brightness)
- Color Value (HSB, RGB or CIE xyY)
- Date/Time Value
- Current date and/or time
- Image
- An image to display. Send a binary bmp, jpg, png or any other supported format to this channel.
- Location
- GPS coordinates as Latitude,Longitude,Altitude
- Rollershutter
- Trigger
For our device we will use two channels, one for input (poti) and one for output (servo).
Input and output Channel
The values of the potentiometer will be the input. The values are between 0 and 4095 and clearly are numbers, so we choose the number value. Choose a clear name for the Channel Identifier. We will use "BTS_IoT_Potentiometer". Add a Label. This will show up in your Page (e.g. "BTS_IoT Potentiometer").
As we will only receive something on this Channel, we will only define the state topic (what we receive). This is the output topic of our device: "gen_mqtt_1/pot"". Add the min and max values. Click on Create.
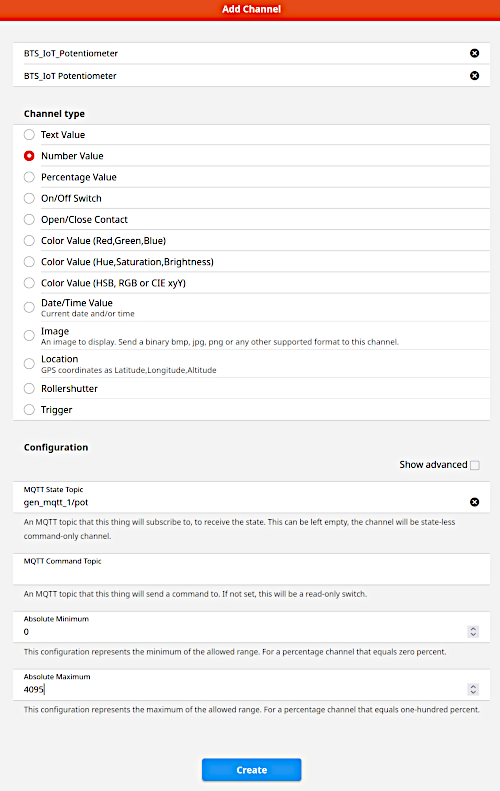
The values for the servo will be the output. The values are between 0 and 180 and we choose the number value. Channel Identifier will be "BTS_IoT_Servo" and the Label "BTS_IoT Servo".
As we will only send something on this Channel, we will only define the command topic (what we send). This is the input topic of our device: "gen_mqtt_1/servo". Add also the min and max values. Click on Create.
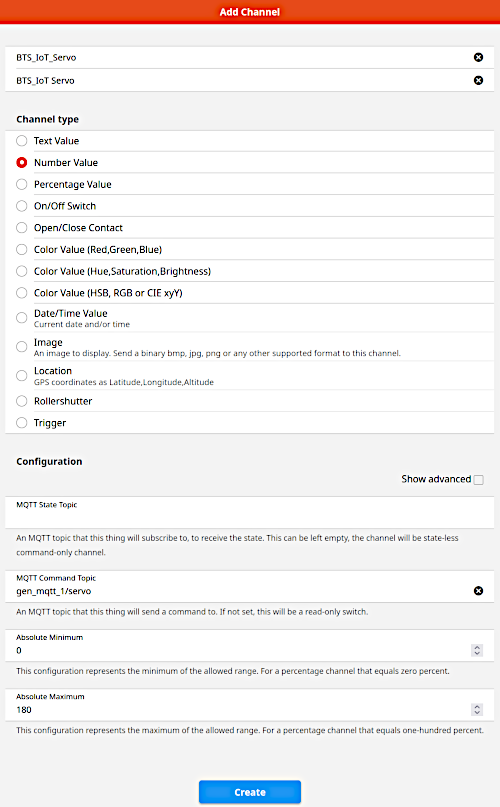
Now finally we will add the location. Go to your Model and to the classroom SC4. Click Create equipment from Thing. Choose The MQTT BTS_IoT_Pot_Servo Thing. Select all the channels and click on Add to Model.
Items to control things
As seen everything in openHAB is happening through items. So we need to link our channels to items. But let's do this in an exercise:
"Just do it" OpenHAB 6:
Built and program the generic device. Configure and test everything as described, but choose your own names, IDs and Labels. Document your screens.
Add a third Channel (type text) for the topic
gen_mqtt_1/pot_json. ActivateShow advanced. UnderTransform Valueswe have a field calledIncoming Value Transformations. Here we can add the TextJSONPATH:$.Pot_valueto retreive the value from the JSON string. (Another possibility is to do thr transformation on the ITEM level by choosingJSONPATHand the expression:$.Pot_value). Document your screens.
Tip: Don't use spaces in your messages. This makes transformations easier.Add your MQTT device Items to your SC4 page. For the Servo use a stepper card (from 0°-180°, step 10°). Now we are able to see the potentiometer value and to manipulate the servo. Document your new SC4 page.

Rules in openHAB
What would life be without rules :))
In an home automation system we want to automate things, so we need rules to do so. In openHAB the rules are defined via the .rules files or via the GUI (jsondb). In the GUI we can choose to use Blockly, Javascript or DSL.
In the docs https://www.openhab.org/docs/configuration/rules-dsl.html) we see that most explanations use still the rules files. We could use the GUI to create rules, but as it stays difficult for the moment (2021) to get information. Most rules examples in the net are for V2 of openHAB. So we stick with the files.
The rules files use a Domain Specific Language (DSL) near to Xtend, a general-purpose high-level programming language for the Java Virtual Machine. So if you want to dig deeper it is a good idea to look here.
As in most programming languages we can import missing functions and use our own variables, but for most rules it suffices to program some instructions.
Let's look at a simple instruction line. Every rule begins with the keyword rule and has a minimum of one condition (when) and one or more instructions if the condition is fulfilled (then).
    rule "<RULE_NAME>"
    when
        <TRIGGER_CONDITION> [or <TRIGGER_CONDITION2> [or ...]]
    then
        <SCRIPT_BLOCK>
    end
Triggering a rule can mainly be:
- Item-based (openHAB event bus)
- Time-based
- System-based (system status)
- Thing-based (e.g. Thing change from ONLINE to OFFLINE)
- Channel based (depends on the Binding)
As events can hardly occur at the exact same time we don't use logic AND combinations, but only OR combinations.
In the when block we use a trigger condition. Item based trigger conditions use the following syntax:
    Item <item> received command [<command>]
    Item <item> received update [<state>]
    Item <item> changed [from <state>] [to <state>]
The then block includes a script to perform things we need. The language used is the same that is used in the Xtend language.
Let's cook a little rule. Our potentiometer should control the servo, but only in the range from 1000 to 2800, where 1000 = 0° and 2800 = 180°. The when is clear, as we need to react on a change of the potentiometer.

An now we code a little bit. The value of the pot object is to be found in the state variable. To facilitate the code we create our own integer variable to hold the value. For this we must cast the state to a number (as Number) and convert the number to an integer (.intValue). For the rest the xtend code is very similar to Arduino code (C++) and easily readable. More infos on the syntax can be found here. Use Visual Studio Code and a samba share to the log files to get help in the syntax and to control the outputs.

"Just do it" OpenHAB 7:
- Test the rule from above. For this reduce the DELAY_MS variable in the Arduino sketch to 500 ms. Now change the rule so that we get 0° for a pot value between 0 and 500, 90° for a pot value between 1550 and 2550 and 180° for a pot value above 3600. Document the output.
Graphs
An important thing when handling data is the visualisation. Humans can much easier interpret behaviour of IoT devices from graphs than from columns and rows of data numbers.
"Just do it" OpenHAB 8:
- Create a chart page with 2 charts. One chart should containing the two temperature values over one day and the other chart the two luminosity values over one day.
Don't forget the people!
When programming a home automation system, it is important to ask feedback from the people using the building! and to consider their wishes.
Without the people the automation will not work!
And don't forget to always add a manual override if possible.
Using InfluxDB database and Grafana to create charts
If you want to create more complex charts or dashboards, with a database and the powerful graphics software Grafana, look here at the end of the page:
http://weigu.lu/sb-computer/sb_home_server/index.html.
Interesting links
- docker: https://www.weigu.lu/sb-computer/docker/index.html
- openHAB container: https://hub.docker.com/r/openhab/openhab
- Semantic Model: https://community.openhab.org/t/a-deep-dive-into-the-semantic-model/127763
- Things: https://www.openhab.org/docs/configuration/things.html
- Items: https://www.openhab.org/docs/configuration/items.html
- Rules: https://www.openhab.org/docs/configuration/rules-dsl.html
- JSONPath: https://www.openhab.org/addons/transformations/jsonpath/
- Sitemaps: https://www.openhab.org/docs/configuration/sitemaps.html
- Xtend expressions: https://www.eclipse.org/xtend/documentation/203_xtend_expressions.html
- Z Wave vs Zigbee: https://goodhomeautomation.com/z-wave-vs-zigbee-smart-home-protocols/
- Generic MQTT device: https://www.openhab.org/addons/bindings/mqtt.generic/
- a book on openHAB 2 in German:
https://www.amazon.de/Smart-Home-openHAB-Heimautomation-Open-Source-L%C3%B6sung/dp/3836259761/ - a book on IoT security in German: https://www.amazon.de/dp/3864903432
- two books on IoT security in English:
https://www.amazon.com/Abusing-Internet-Things-Blackouts-Freakouts/dp/1491902337
https://www.amazon.com/IoT-Hackers-Handbook-Practical-Internet/dp/1484242998
Appendix A: Install openHAB directly on debian (no docker)
We could use openHABian an SD-card images pre-configured with openHAB on our Raspberry Pi. This would be the easiest solution. To be more flexible with the platform, let's do it on our own on a Debian based Linux system (package repo with apt).
OpenHAB is written in Java, so we first need a Java platform. As suggested we use Zulu. We need Zulu 11 for openHAB V3.x. We download the package in a newly created directory, unpack it and add the right links with the following commands:
    sudo apt update && sudo apt upgrade
    sudo mkdir /opt/jdk
    cd /opt/jdk
    sudo wget http://cdn.azul.com/zulu-embedded/bin/zulu11.41.75-ca-jdk11.0.8-linux_aarch32hf.tar.gz
    sudo tar -xvzf zulu11.41.75-ca-jdk11.0.8-linux_aarch32hf.tar.gz
    sudo update-alternatives --install /usr/bin/java java \
    /opt/jdk/zulu11.41.75-ca-jdk11.0.8-linux_aarch32hf/bin/java 1
    sudo update-alternatives --install /usr/bin/javac \
    javac /opt/jdk/zulu11.41.75-ca-jdk11.0.8-linux_aarch32hf/bin/javac 1
    java -version
The backslash at the end of a line means that the command this line continues in the next line. In the terminal you have to type the command in one line and remove the backslash.
Now we will install the openHAB stable release (https://www.openhab.org/docs/installation/linux.html):
    wget -qO - 'https://openhab.jfrog.io/artifactory/api/gpg/key/public' | sudo apt-key add -
    curl -fsSL "https://openhab.jfrog.io/artifactory/api/gpg/key/public" | gpg --dearmor > openhab.gpg
    sudo mv openhab.gpg /usr/share/keyrings
    sudo chmod u=rw,g=r,o=r /usr/share/keyrings/openhab.gpg
    echo 'deb [signed-by=/usr/share/keyrings/openhab.gpg] \
    https://openhab.jfrog.io/artifactory/openhab-linuxpkg stable main'  | \
    sudo tee /etc/apt/sources.list.d/openhab.list
    sudo apt update
    sudo apt install openhab
The first command imports the needed public key and the fourth command adds the repository.
The backslash in the fourth line means that the command from line 4 continues in line 5. In the terminal you have to type the command in one line and remove the backslash.
After an update we can install the package.
Now we can start openHAB by and test if its running:
    sudo systemctl start openhab.service
    sudo systemctl status openhab.service
Quit with ctrl-c.
To automatically start after booting the Raspi, execute the following commands to configure openHAB to start automatically using systemd:
    sudo systemctl daemon-reload
    sudo systemctl enable openhab.service
Upgrade openHAB and reboot the Raspi:
sudo apt update && sudo apt upgrade && sudo reboot
Command Line interface (CLI) to use in terminal
Now as openHAB is running, a command named openhab-cli helps us to use openHAB-specific tasks (backup, restore ...) in the terminal.
    openhab-cli backup [--full] [filename]   -- Stores the current configuration of openHAB.
    openhab-cli clean-cache                  -- Cleans the openHAB temporary folders.
    openhab-cli console                      -- Opens the openHAB console.
    openhab-cli info                         -- Displays distribution information.
    openhab-cli reset-ownership              -- Gives openHAB control of its own directories.
    openhab-cli restore filename             -- Restores the openHAB configuration from a backup.
    openhab-cli showlogs                     -- Displays the log messages of openHAB.
    openhab-cli start [--debug]              -- Starts openHAB in the terminal.
    openhab-cli status                       -- Checks status (openHAB running?)
    openhab-cli stop                         -- Stops any running instance of openHAB.
Installing a samba network share on the Raspberry Pi
To be able to access our openHAB installation files from our local PC we will set up a Samba network share. More infos in the openHAB documentation.
An alternative solution is to install a remote plugin in Visual Studio Code to access the Raspi.
We begin with installing samba:
sudo apt install samba samba-common-bin
Next we have to edit the samba configuration file smb.conf.
sudo nano /etc/samba/smb.conf
Add the following to the bottom of the file:
    [openHAB-userdata]
      comment=openHAB userdata
      path=/var/lib/openhab
      browseable=Yes
      writeable=Yes
      only guest=no
      public=no
      create mask=0777
      directory mask=0777

    [openHAB-conf]
      comment=openHAB site configuration
      path=/etc/openhab
      browseable=Yes
      writeable=Yes
      only guest=no
      public=no
      create mask=0777
      directory mask=0777

    [openHAB-logs]
      comment=openHAB logs
      path=/var/log/openhab
      browseable=Yes
      writeable=Yes
      only guest=no
      public=no
      create mask=0777
      directory mask=0777
Next, we need to set up a user and a password for our Samba share. Run the following command to create the user "pi" and set a password.
sudo smbpasswd -a pi
Change the ownership of the openHAB files to "pi" and restart the server:
    sudo chown -hR pi:pi /etc/openhab
    sudo systemctl restart smbd
Now you are able to access the files from your PC. On Linux and Mac you can use smb://samba_server_ip_address/sambashare, in Windows \\samba_server_ip_address/sambashare. Here two examples:
    Linux/Mac: smb://192.168.178.110/openHAB-conf
    Windows:   \\192.168.178.110/openHAB-logs
Paths for openHAB files
In /etc/default we find the config file openhab. In this file we find the links to the openHAB default paths:
OPENHAB_HTTP_PORT=8080
OPENHAB_HTTPS_PORT=8443
OPENHAB_BACKUPS=/var/lib/openhab/backups
OPENHAB_HOME=/usr/share/openhab
OPENHAB_CONF=/etc/openhab
OPENHAB_RUNTIME=/usr/share/openhab/runtime
OPENHAB_USERDATA=/var/lib/openhab
OPENHAB_LOGDIR=/var/log/openhab
Edit the openHAB files from a local PC with Visual Studio Code
As we need to configure openHAB partially using text files, we need an editor. We can use nano with openHAB highlighting on the pi, but it is more comfortable to use an editor on the local machine and work on the pi via network share.
The best support for the moment is offered by "openHAB VS Code", an extension for Visual Studio Code. More infos on editors can be found on in the documentation of openHAB.
Download Visual Studio Code on your PC and install the openHAB extension (icon Extensions). We need a token to communicate with openHAB. Sign in to openHAB with your administrator username and password. Click on the hamburger and than on your profile icon (bottom). Create an API token.
Go to File > Preferences > Settings > Extensions > openHAB Configuration click on "Edit in settings.json". Add the following lines to the json file:
    "openhab.connection.host": "192.168.131.xxx",
    "openhab.connection.port": 8080,
    "openhab.consoleCommand": "ssh openhab@%openhabhost% -p 8101 -t 'log:tail'",
    "openhab.connection.basicAuth.username": "oh.myopenhabtoken.i9JxaXd9MvFD6txqCnht0emBeTzwRHA",
    "openhab.connection.basicAuth.password":"",
More infos are on the github page of the extension.
