Microcontroller projects
Low power and sleep tips and tricks for ATmega328
last updated: 2024-03-04
Quick links
Intro
For my LoRa projects I need a deep sleep of the controller, so that battery life will be maximised. The problem with breakout boards is that they contain many components that consume energy and are not needed. So here are some basic tests to get a feeling on minimal power consumption.
The higher the voltage, the higher the current. For the tests I will use 3 V (2*1.5 V alkaline battery or lithium primary cell).
The original ATmega328P is not recommended for new designs. The actual solution is the ATmega328PB. The ATmega328P exists in a DIP version and can directly be used on a breadboard. The ATmega328PB in an TQFP-32 version can used on a breadboard by using a breakout board.
Arduinos use a 16 MHz external crystal. This crystal will only operate if the voltage is over 2.7 V. The minimum voltage for the Lora module is 1.8 V and for the new ATmega chip the same if we stay below 4 MHz. So to use the batteries to a maximum, we have to run the ATmega328PB with max. 4 MHz. For this we need a bootloader that is capable to program the chip running on the internal RC oscillator.
Burning the Bootloader
The less components we use, the less power is needed. So for the test we could use a breadboard or a prototyping PCB. The circuit needs in a first step only a connector for an external programmer (6 pin AVRISP) to burn the bootloader.
As programmer you can use an Arduino board (look here (https://docs.arduino.cc/built-in-examples/arduino-isp/ArduinoISP)) or e.g. an AVRISP mk2.
The connections needed on the programmer (Uno) are the SPI Pins MISO, MOSI, SCK and Chip Select to connect to Reset (Reset on ISP) and power (VCC and GND). We can use the normal header for this (10,11,12,13) or the 6 pole ISP header. I had problems with the ISP header, so better use the normal header.
As I had problems by using the ISP header (wrong chip signature) I would recommend to use the normal header!
The targets ATmega328P DIP Version or ATmega328PB TQFP-32 Version use the following pins:
| Name | Arduino Uno ISP | Arduino Uno Header | ATmega328PB (TQFP_32) | ATmega328P (DIP) |
|---|---|---|---|---|
| MOSI | 4 | 11 | 15 | 17 |
| MISO | 1 | 12 | 16 | 18 |
| SCK | 3 | 13 | 17 | 19 |
| Reset (CS) | 5 | 10 | 29 | 1 |
| 3V (5V) | 2 | 3V3 (5V) | 4 | 7 |
| GND | 6 | GND | 5 | 8 |
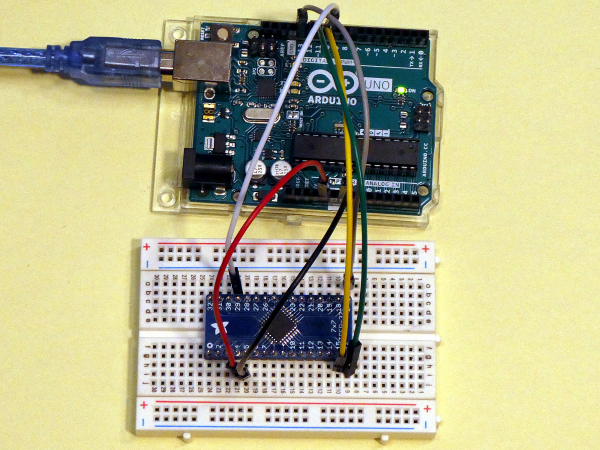
Now we could use the board with only the external programmer connected (without bootloader) and change the fuse bits with avrdude. But a bootloader is a cool thing and the chance to have an USB/TTL converter by hand is bigger than having a programmer. So we will use a bootloader.
We can't use the Arduino bootloader, because it's programmed for an 16 MHz external crystal. So we are very happy that MCUdude (Hans) helps with it's different Cores bootloader. In our case we need the MiniCore. Add the following json text line to to File > Preferences > Additional Boards Manager URLs: (you can add multiple URLs, separating them with commas).
https://mcudude.github.io/MiniCore/package_MCUdude_MiniCore_index.json
After adding the json strings, we need to install the files. For this open the Boards Manager from Tools > Board > Boards Manager.... Scroll down and click on install. After installation is complete, restart Arduino.
Now we can select our Board from Tools > Board.
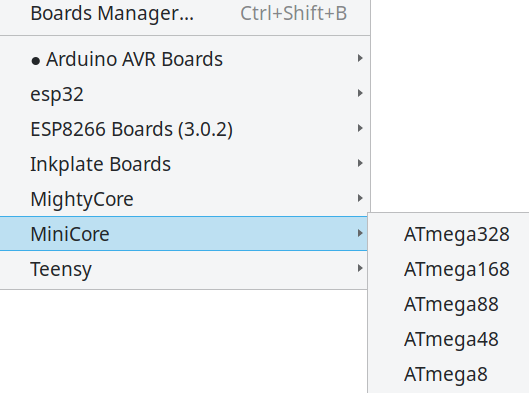
We choose a bootloader with internal RC oscillator and 1 MHz or 8 MHz. The libraries for my temperature sensor (DS18B20) won't work with 1 MHz. They need min. 4 MHz. Fortunately with the help of the WR-register we can change the frequency during runtime, so it is possible to use the 8 MHz bootloader and run the chip on 1 MHz or 4 MHz.
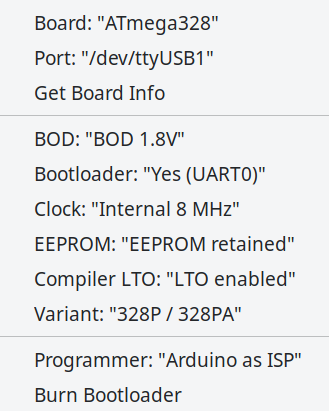
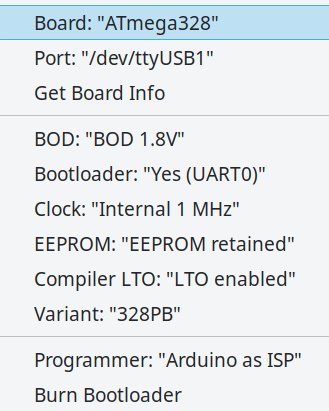
Click on Burn Bootlader to install the bootloader.
Programming the chip
Now we don't need the AVRISP header any more, but a new header to connect the TTL/USB converter. The important connections are TxD and RxD naturally crossed and ground. As it is more comfortable to let the Arduino IDE set the chip in programming mode with the help of an RTS or DTR signal we use an appropriate cable or tweak a converter with an CH340 chip by adding pin 13 through an 100 nF capacitor to the header.
| USB to Serial cable (FTDI) | ATmega328PB (TQFP_32) | ATmega328P (DIP) |
|---|---|---|
| RTS (green) | 29 (Reset) | 1 (Reset) |
| RxD (yellow) | 31 (TxD) | 3 (TxD) |
| TxD (orange) | 30 (RxD) | 2 (RxD) |
| 3V (5V) | 3V Battery + | 3V Battery + |
| GND | 3V Battery - | 3V Battery - |
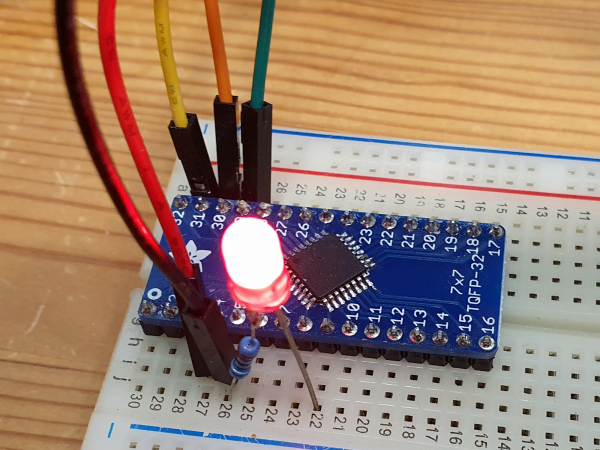
Here an example with an attached LED to pin PD5 (Arduino Pin 5). The classic blink.ino sketch can now be programmed with the Arduino IDE. The chip is running on an internal RC oscillator with 8 MHz.
    void setup() {
      pinMode(5, OUTPUT);     //LED on pin 5
    }

    void loop() {
      digitalWrite(5, HIGH);  // turn the LED on (HIGH is the voltage level)
      delay(5000);            // wait
      digitalWrite(5, LOW);   // turn the LED off
      delay(5000);            // wait
    }
Low power and deep sleep
Reducing the clock
To measure the current, I use an instrument called Current ranger from LowPowerLab.
For the blink program I get 4 mA if LED is off and 4.8 mA if the LED is on.
The next step ist to switch down to 1 MHz, For this we tweak the internal CLKPR register (datasheet of Atmega328)
    void setup() {
      set_clock_to_1MHz();
    }

    void loop() {
      pinMode(5, OUTPUT);
      digitalWrite(5, HIGH);
      delay(5000);
      pinMode(5, INPUT);
      delay(5000);
    }

    void set_clock_to_1MHz() {
      CLKPR = 0x80; // enable change of CLKPR (4 CLPS bits must be 0)
      CLKPR = 0x03; // set the CLKDIV to 8 (0b0011 = div by 8)
      delayMicroseconds(1000);
    }

    void set_clock_to_2MHz() {
      CLKPR = 0x80; // enable change of CLKPR (4 CLPS bits must be 0)
      CLKPR = 0x02; // set the CLKDIV to 4 (0b0010 = div by 4)
      delayMicroseconds(1000);
    }

    void set_clock_to_4MHz() {
      CLKPR = 0x80; // enable change of CLKPR (4 CLPS bits must be 0)
      CLKPR = 0x01; // set the CLKDIV to 2 (0b0001 = div by 2)
      delayMicroseconds(1000);
    }

    void set_clock_to_8MHz() {
      CLKPR = 0x80; // enable change of CLKPR (4 CLPS bits must be 0)
      CLKPR = 0x00; // set the CLKDIV to 0 (0b0000 = div by 1)
      delayMicroseconds(1000);
    }
Cool! The current goes down to 820 µA and 1980 µA.
!! We also see that the delay time increases by the dividing factor.
I also tried 2 MHz and 4 MHz:
| Program | LED on | LED off |
|---|---|---|
| normal blink 8 MHz | 4800 µA | 4000 µA |
| blink off as input 8 MHz | 4800 µA | 3200 µA |
| blink off as input 4 MHz | 3200 µA | 2334 µA |
| blink off as input 2 MHz | 2460 µA | 1310 µA |
| blink off as input 1 MHz | 1980 µA | 820 µA |
LowPower library
Next let's test the low power library. We use the the newest version of the LowPower library from LowPowerLab. This is a fork from the original lib from rocketscream (Low-Power) that supports the ATmega328BP in it's newest version. To get this newest version we need to clone the repo or download the zip file (Add the zip file with Sketch > Include Library > Add .ZIP library...).
First we will test the with the following absolutely minimal program:
    #include "LowPower.h"

    void setup() {
      set_clock_to_1MHz();
    }

    void loop() {
      LowPower.powerDown(SLEEP_4S, ADC_OFF, BOD_OFF);
    }
We will use the power down wake periodic example from the library. In PowerDown mode the watchdog timer will wake the CPU up. We can choose between different wakeup times (look in LowPower.h).
We get a current of about 3 µA (average) during the sleep period. This current does not change with the frequency. This gives us 3 µAh for one hour and 3 µA⋅8766 h/year = 26.3 mAh/year.
During the awakening a peak occurs. Here the peaks for 8 MHz, 4 MHz, 2 MHz and 1 MHz,
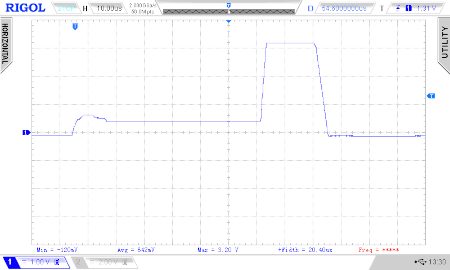
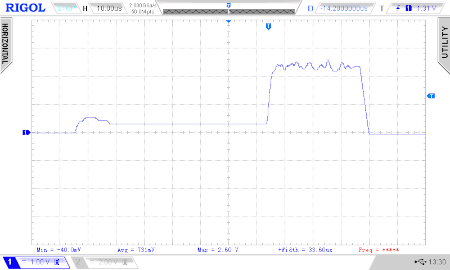
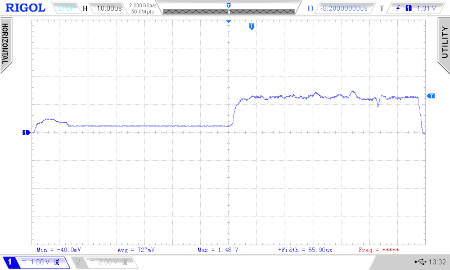
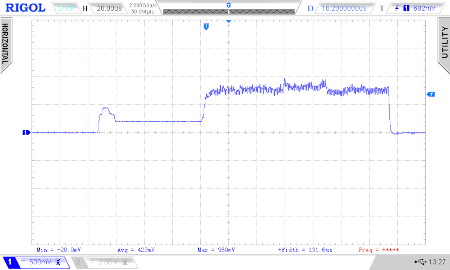
The peak is very short (less then 200 µs). From the oscillogram we can calculate a charge for the different frequencies. The first measurement is limited by the range of the ammeter. We can suggest that we get the double of the 4 MHz measurement, so 4.8 mA. We can read approximatively from the oscillograms:
8 MHz: 120 mAµs 4 MHz: 112 mAµs 2 MHz: 102 mAµs 1 MHz: 116 mAµs
So the charge doesn't differ much. We will stay with 120 mAµs for all 4 frequencies. By waking up once a second we have 3600⋅(120 mAs/1000000)⋅(1h/3600s) = 0.00012 mAh in one hour or 1.05 mAh/year.
| sleep time | during sleep [mAh/year] | wakeup peak [mAh] | wakeup peak [mAh/year] | sum [mAh/year] |
|---|---|---|---|---|
| SLEEP_15MS | 26.3 | 0,008 | 70.128 | 96.4 |
| SLEEP_30MS | 26.3 | 0,0040 | 35.064 | 61.4 |
| SLEEP_60MS | 26.3 | 0,0020 | 17.532 | 43.8 |
| SLEEP_120MS | 26.3 | 0,0010 | 8.766 | 35.1 |
| SLEEP_250MS | 26.3 | 0,00048 | 4.207 | 30.5 |
| SLEEP_500MS | 26.3 | 0,00024 | 2.104 | 28.4 |
| SLEEP_1S | 26.3 | 0,00012 | 1.05219 | 27.4 |
| SLEEP_2S | 26.3 | 0,00006 | 0.5260 | 26.8 |
| SLEEP_4S | 26.3 | 0,00003 | 0.2630 | 26.6 |
| SLEEP_8S | 26.3 | 0,000015 | 0.1315 | 26.4 |
ATmega328p with DS18B20 temperature sensor
Here a test with an ATmega328p DIP version on a breadboard using a temperature sensor and later sending the temperature with a LoRa chip to a gateway. I use the 8 MHz internal RC oscillator and reduce the clock to 4 MHz and even 1 MHz in the code.
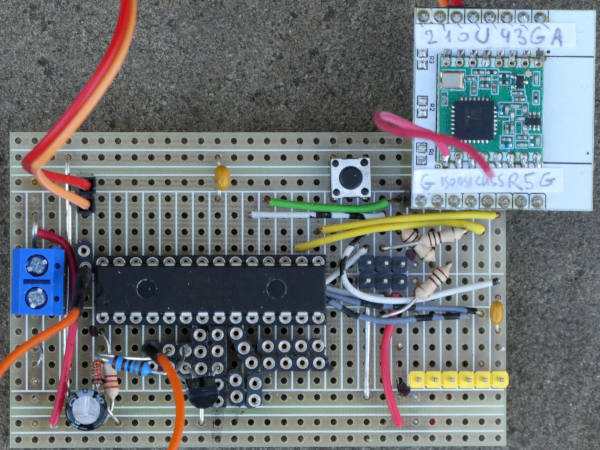
We are ready to test a little sketch with an DS18B20 temperature sensor. The data is sent every 2 minutes through the serial port.
    /*   ATmega328_mini_core_deep_sleep_ds18b20.ino by weigu.lu
     *
     *   We use an ATmega328p (Arduino) on a breadboard with a minicore bootloader with
     *   8MHz internal clock (https://github.com/MCUdude/MiniCore).
     *   Most of the time we sleep and go down to 1MHz by dividing the clock.
     *   An DS18B20 is connected with VCC to pin D3 and with the data input to pin D4.
     *   The DS18B20 library needs 4MHz! The temperature is send by serial to the monitor.
     *
     *   RESET  PC6  1  |  |  28 PC5 A5
     *   D0 RX  PD0  2  |  |  27 PC4 A4
     *   D1 TX  PD1  3  |  |  26 PC3 A3
     *   D2     PD2  4  |  |  25 PC2 A2
     *   D3 PWM PD3  5  |  |  24 PC1 A1
     *   D4     PD4  6  |  |  23 PC0 A0
     *   VCC         7  |  |  22 GND
     *   GND         8  |  |  21 AREF
     *   ctal   PB6  9  |  |  20 AVCC
     *   ctal   PB7 10  |  |  19 PB5 D13 SCK
     *   D5 PWM PD5 11  |  |  18 PB4 D12 MISO
     *   D6 PWM PD6 12  |  |  17 PB3 D11 MOSI PWM
     *   D7     PD7 13  |  |  16 PB2 D10 PWM
     *   D8     PB0 14  |  |  15 PB1 D9 PWM
     *
     *   If we get the temperature every 2 minutes we need about
     *   Always: 0.007mA*3600s = 25.2mAs = 0.007mAh
     *   Temp: (4.5mA*0.68)*30 = 91.8mAh = 0.0255mAh
     *   Voltage: 2.5mA*0.008s = 0.02mAs **forget it**
     *   All together gives 0.026mAh per hour or 228mAh per year
     */

    //#define DEBUG

    #include "LowPower.h"
    #include <OneWire.h>
    #include <DallasTemperature.h>

    long send_interval = 15;        // interval between sends, multiple of 8s (15 = 2min)

    const byte PIN_DS18B20_POW = 3;
    const byte PIN_DS18B20_DATA = 4;
    float temperature;
    unsigned int voltage;

    OneWire oneWire(PIN_DS18B20_DATA);
    DallasTemperature DS18B20(&oneWire);

    void setup() {
      pinMode(PIN_DS18B20_POW,OUTPUT);
      digitalWrite(PIN_DS18B20_POW,LOW);
      DS18B20.begin();
      set_clock_to_1MHz();
      delayMicroseconds(10);
    }

    void loop() {
      set_clock_to_4MHz(); // DS18B20 lib needs min. 4MHz
      delayMicroseconds(1);
      temperature = get_temperature_DS18B20();
      set_clock_to_1MHz(); // back to 1MHz
      delayMicroseconds(1);
      voltage = get_voltage();
      #ifdef DEBUG
        Serial.begin(38400); // 38400/8 = 4800, set monitor to 4800 bit/s
        Serial.print(String(temperature) + "°C  ");
        Serial.println(String(voltage) + "V");
        Serial.end();
      #endif
      for (int i=0; i<send_interval; i++) {
        LowPower.powerDown(SLEEP_8S, ADC_OFF, BOD_OFF);
      }
    }

    float get_temperature_DS18B20() {
      digitalWrite(PIN_DS18B20_POW,HIGH);
      delayMicroseconds(1);
      DS18B20.requestTemperatures();
      float temp = DS18B20.getTempCByIndex(0);
      digitalWrite(PIN_DS18B20_POW,LOW);
      return temp;
    }

    unsigned int get_voltage() { // in mV
      ADCSRA = 0x85;                   // ADEN, div = 32 = 125kHz
      ADCSRB &= 0xF8;                  // free running mode
      ADMUX = 0x6E;                    // 01 Ref = Vcc 1 ADLAR (left 8 Bit)
      delayMicroseconds(750);          // wait for Vref to settle  6ms = 750*8!
      ADCSRA |= (1 << ADSC);           // start 1 conversion
      while (bit_is_set(ADCSRA,ADSC)); // measure and forget 1 conversion
      delayMicroseconds(10);
      ADCSRA |= (1 << ADSC);           // start 2 conversion
      while (bit_is_set(ADCSRA,ADSC)); // measuring  Vcc (in mV); 281600=1.1*256*1000
      return 275000L / ADCH;    // adjusted to real multimeters!
    }

    void set_clock_to_1MHz() {
      CLKPR = 0x80; // enable change of CLKPR (4 CLPS bits must be 0)
      CLKPR = 0x03; // set the CLKDIV to 8 (0b0011 = div by 8)
      delayMicroseconds(1000);
    }

    void set_clock_to_2MHz() {
      CLKPR = 0x80; // enable change of CLKPR (4 CLPS bits must be 0)
      CLKPR = 0x02; // set the CLKDIV to 4 (0b0010 = div by 4)
      delayMicroseconds(1000);
    }

    void set_clock_to_4MHz() {
      CLKPR = 0x80; // enable change of CLKPR (4 CLPS bits must be 0)
      CLKPR = 0x01; // set the CLKDIV to 2 (0b0001 = div by 2)
      delayMicroseconds(1000);
    }

    void set_clock_to_8MHz() {
      CLKPR = 0x80; // enable change of CLKPR (4 CLPS bits must be 0)
      CLKPR = 0x00; // set the CLKDIV to 0 (0b0000 = div by 1)
      delayMicroseconds(1000);
    }
Energy consumption
In the following screenshots we see the current in µA (5 mV for 5 µA) and in mA (5 mV for 5 mA). In deep sleep we need about 7 µA. The peak during measuring needs another range to be captured and is about 4.5 mA during 0.68 s.
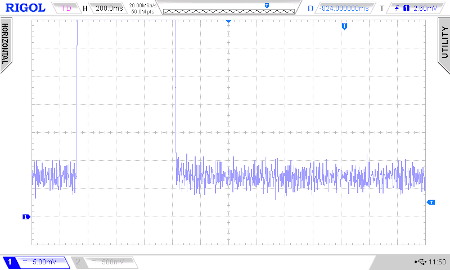
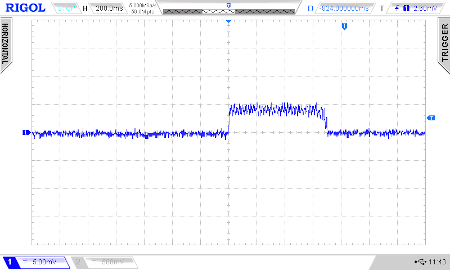
If we measure the temperature every 2 minutes we need about:
- 7 µA during all the time (1 hour):
0.007 mA·3600 s = 25.2 mAs = 0.007 mAh - 30 times per hour for the measuring:
(4.5 mA·0.68 s)30 = 91.8 mAh = 0.0255 mAh
Together we need about 0.026 mAh in one hour. This gives us 228 mAh per year (8766 h).
ATmega328P with DS18B20 temperature sensor and a LoRa chip
To send the temperature value (or other data) to my house automation system I want to use low power LoRa radio communication with batteries. The continuation of my efforts are documented under microcontroller/lora_p2p.
Interesting links:
- MCUdude cores: https://github.com/MCUdude
- Lora p2p: http://weigu.lu/microcontroller/lora_p2p/index.html
- Datasheet ATmega328PB https://ww1.microchip.com/downloads/aemDocuments/documents/MCU08/ProductDocuments/DataSheets/40001906C.pdf
